Compressed or zipped packages can hold many files. You will use these to upload many files at once or to upload the published HTML pages created by programs such as Softchalk.
Uploading and linking to a zipped (package) file is a two step process in Blackboard 9. You will need to first upload the zipped file to the Files section, then go to the content area where you want the link to appear and link to the index.html file (or other starter file) inside the package
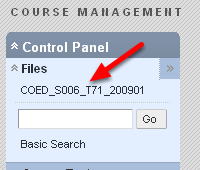
Go to the files area in your course
First make sure Editing is "On" (in the upper right of your class site).
In the Control Panel (on the lower left side of your course in Blackboard Learn (version 9) Click on Files, then click on your course name.
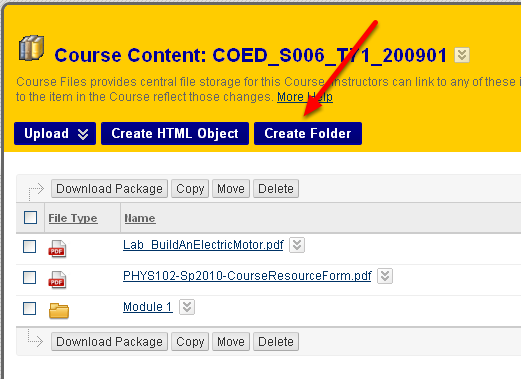
Create a folder for your zipped package
Click on Create Folder to create a folder to hold the contents of your zipped package. You can do this either directly in the files area or inside any other folder in your files area. You will want this separate folder to contain the unzipped contents of your package.
After the folder is created, click on the underlined name of the folder to enter it.
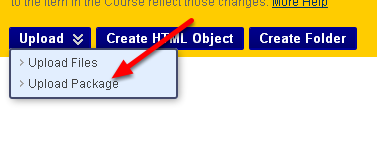
Upload the package
Move your mouse cursor over the Upload button and choose Upload Package
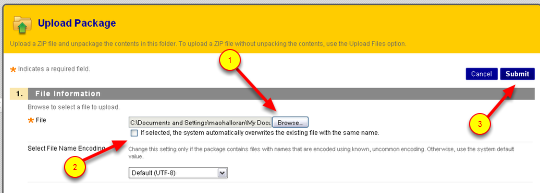
Upload and extract
(1) Click the Browse button and browse and find your zipped file
(2) Check the box "If selected, the system overwrites the existing file with the same name" if you are replacing an existing package with an updated version.
(3) Click Submit
You will see all the contents of your zipped file extracted and listed
(If the zipped file does not expand into individual files then you may have chosen "Upload Files" instead of "Upload Package".
Make a link to the "starter file" within you zipped package
If the zipped package is a set of files for webpages (such as those created by Softchalk, for example) then there will be a "starter page" called index.html or index.htm. You will make a link to that starter page, which will in turn be linked to the other files in your package.
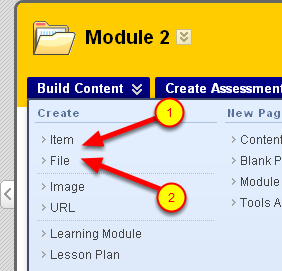
Go the Content Area where you want to place the link. Move your mouse cursor over the Build Content Button. You can choose either "Item" of "File". We will discuss using an Item first.
Click on "Item.
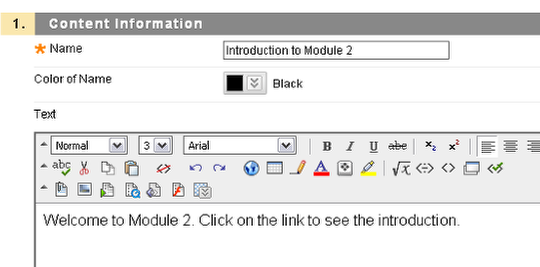
Give your item a name and description
Give your item a Name and write an (optional) introduction in the textbox.
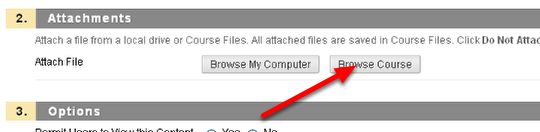
Add the index page as an attachment
Click the "Browse Course" button. This choice lets you browse through the files already uploaded to this course (including the package you just uploaded and unzipped).
Browse and find the index file
A new window will open. Find the folder in which you unzipped your package and click on its name to open in.
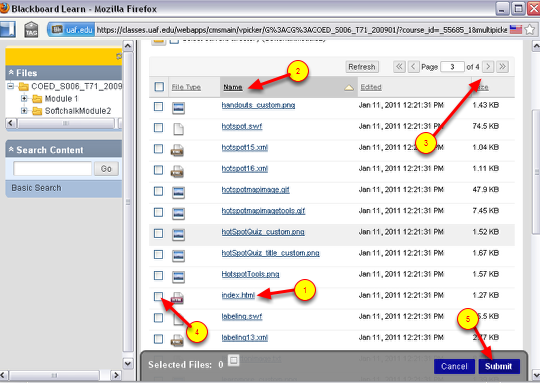
(1) Browse until you find the index.html (or index.htm or other starter page).
(2) You can click on "Name" to sort files by name and make them easier to find.
(3) If there are a lot of files you may need to click though more than one "page" of file names
(4) Check the box next to the index.html file
(5) Click Submit
Continue setting up your "Item"
The files window will close and you’ll be back to the page in which you set up your item. You’ll now see "index.html" (or other starter file name) listed as the Link Title. Change that name to a user friendly name that your students will recognize. (A title such as "Click Here for Module 2" for example) You want to create a link to this file and Give users Read access to all files and folders in the folder.
Set up any availability options etc. and then scroll down and click "Submit"
Linked package files are now added to the item
The link to the index file will appear as a underlined link under the Item. When students click on that link they will get to the first page in the package (the "starter file").
Adding the link to the package as a file rather than an item
If , when you use the "Build Content" button, you choose to add the link to the package as a "File" rather than an item, the steps you go through will be very similar. The difference is the header text itself will be the underlined link and you will NOT be able to add any additonal description. In that case you may want to add descriptive text as an item above the link to the file. You will be able to open the packaged file in a new window, something you cannot do if you add it as an item.
ISSUES WHEN COPYING A COURSE CONTAINING A ZIPPED "PACKAGE"
UPDATE 24 July 2013: this bug seems to be fixed when using course copy (in UAS Blackboard 9.1.9) but not when using Export/Import
When a zipped "package" file is copied from one course to another, students may not have "permission" to view the folder. You will have to test this using a test-student account since the Instructor will have no problems viewing the contents.
This can be corrected by
1) Deleting the link to the index file and re-creating it
2) Adding permissions to the folder containing the package
- Go to the Control Panel
- Go to Files – click on the course folder
- Find the folder containing the unzipped package contents
- Use the drop-down menu next the folder name, click on Permissions
- Click on Add Course User List
- Select Students (or All Course Users) and give then "Read" permission, Submit
It is only necessary to add Read permission to the folder – not to each individual file in the folder.
End of tutorial