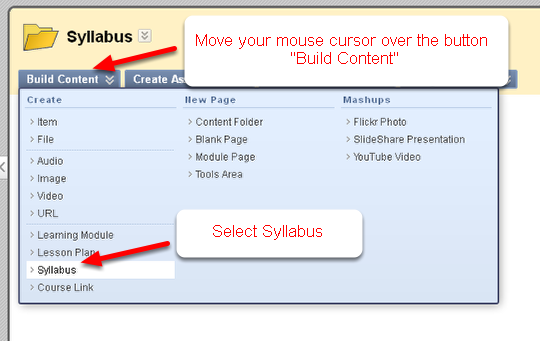
This tutorial explains how to use Respondus to convert a Word file into a test which which can be imported into Blackboard. UAS has a site license for Respondus, which is a Windows program. Contact the helpdesk for assistance in installing the program.
Set personality to Blackboard 7.x-9.x
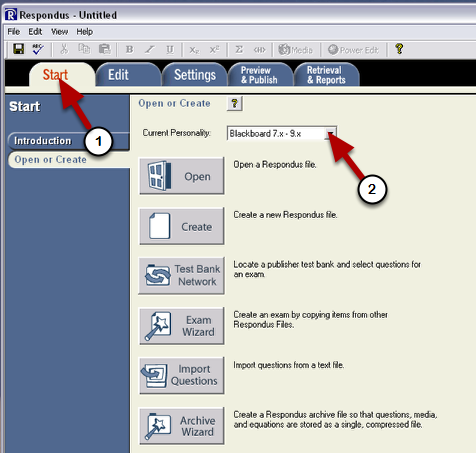
Start Respondus.
(1) Make sure you are on the "Start" tab.
(2) Set the "personality" to Blackboard 7.x-9.x
Getting Help
The Help in Respondus is context sensitive. The easiest way to find the "Help" for importing questions is to click on Import Questions then click on Help in the dialog box that opens up. Click on links in the Help to find help for:
- The Standard Format for Importing Documents
- Importing Images with Questions
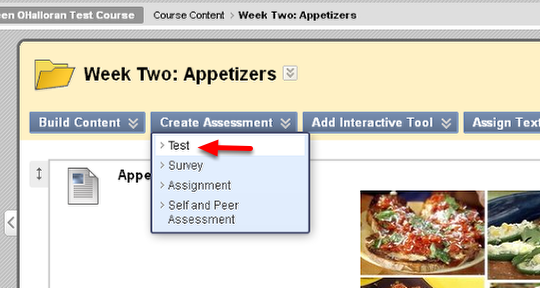
Create an Exam using Word (.doc or .docx) or as a Rich Text Format file (.rtf)
Creating an Exam File in Word. A variety of question types can be used. This tutorial will discuss the most common ones. To learn more about the different options, Click on the Import Questions button in Respondus and then click on Help in the dialog box that opens.
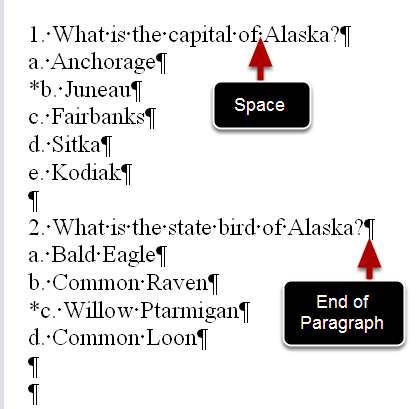
Multiple Choice: Simply type the question as shown above. Note that "show hidden characters" in Word has been turned ON. This means that spaces are shown as dots and the end of paragraphs by the special character that looks like a backwards P.
- Each question has a number followed by either a period or a close-parenthesis and a single space: 3. or 3)
- Each answer has a letter followed by a period or close-parenthesis and a single space: b. or b)
- The correct answer is preceded by an asterisk: *
- There should be no spaces in front of the leters and numbers
- Do NOT let Word use auto-numbering (turning the numbers or letters into a automatic list). If autonumbering starts you can type Control-Z (undo) to cancel it.
You can insert pictures in your questions by inserting them in the Word document in a new paragraph after the question. Note that the picture must be a single image file. You cannot create a picture or label it using the Word drawing tools. One way to create a single image file of a picture you wish to label is to insert the picture in a separate Word or Powerpoint document, use the drawing tools to label it, and then use a screen capture program like Snag-it or Jing ( www.jingproject.com ) to select the area around the picture, make a screen capture, and then save the image to a file.
If you are starting with a Word file that is supplied by a publisher, then you can also indicate answers by listing them at the end of the document – see the Respondus Help for more information.
Other question types
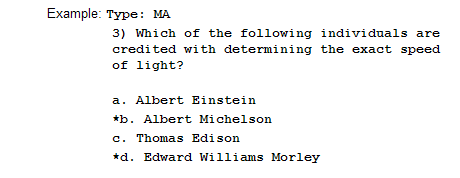
Multiple choice is the default quesion type. Other question types must be labeled. You do this by including the text "Type: X" above the question where the word Type is followed by a colon and "X" indicates the question type. You must insert this text for EVERY question that is not a multiple choice question. Even if you have several of the same questiont types in a row, the designation "Type: X" must precede EVERY question. Some question types include:
Essay: Type: E
Multiple Answer (more than one correct answer): Type: MA
Fill in the Blank: Type: F
Matching: Type: MT
Ordering: Type: ORD
In is also possible to include feedback for questions. Additional information about formatting question types and indicating answers and feedback can be found in the Respondus Help.
Importing the Word File into Respondus
Once your exam has been typed up you will need to save and close your Word file. (You don’t have to close Word, just that particular document).
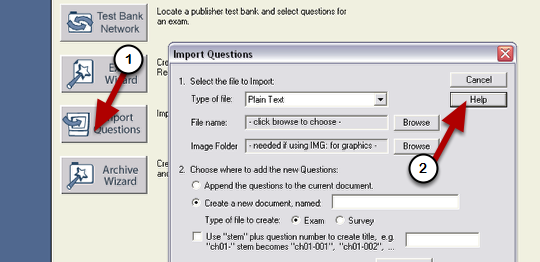
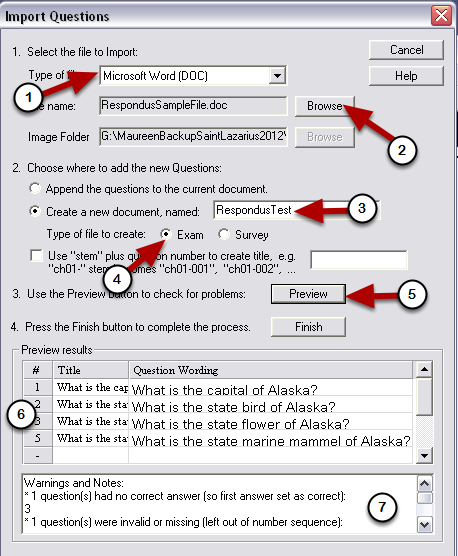
You will start Respondus and click Import Questions
(1) Choose the type of file (correct version of Word)
(2) Click Browse and find your file
(3) Type a name for the "Respondus File" that will be created by this program
(4) Choose Exam or Survey (surveys are the same as exams but do not have correct answers)
(5) Click Preview
In the Window below you’ll see the questions that were imported and Warnings and Notes below.
- Warning: Questions with duplicate titles. This can be ignored – if you didn’t explicitely give the question a title then Respondus uses the first words for a title. Some of your questions may begin with the same words.
- Warning: X questions had no correct answers (with questions listed below) – do not ignore this one, you either forgot to indicate an answer or it is formatted incorrectly
- Warning: X questions were invalid or missing – this should not be ignored either. In this case the number of questions is also wrong, so this indicates what is probably a formatting error.
Do not close Respondus or this dialog box yet!
Re-open the Word file
Note the question numbers which had possible errors. Without closing the "Import Questions" dialog box, switch back to the Word document. This can easily be done if you did not close Word (just the document) – You can easily find the Word exam file in your most recently opened documents.
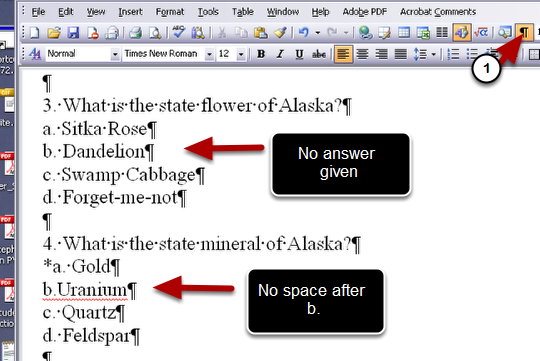
Go the the question(s) where there were possible errors. You’ll find the errors most easily if you "turn on" the ability to see unprinted (invisible) characters using the backwards "P" button (1).
In the example above, there was no answer given for question "3" and question "4" is not formatted correctly because there is no space after the "b". A tab would not be correct in this case either – it must be a space. This is why showing the invisible characters is helpful
After you have edited the Word document to correct it, save the document and then close it (but do not close Word in case you need to come back).
Go back to Respondus

Go back to Respondus. If you did not close the Import Questions dialog box, you simply need to click "Preview" again.
If everything has been cleared up, you can click "Finish"
Preview your questions
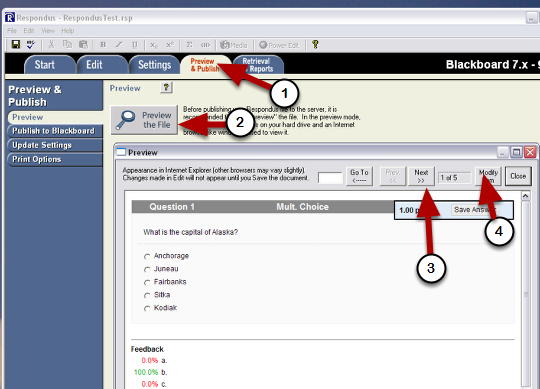
Click on the Preview and Publish tab(1), then on Preview the File(2). Click through to view each question (3) If you find an error you can click "Modify Item" to edit (4). Click Close when you are done.
When you are ready you can click "Publish to Blackboard"
Publish to Blackboard
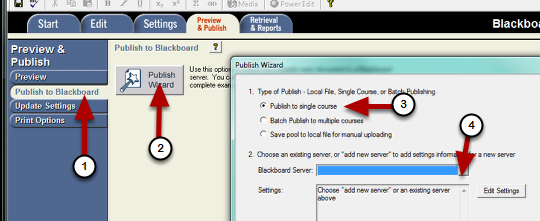
- Click on the Publish to Blackboard button on the left (1) then on Publish Wizard (2).
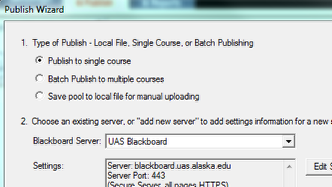
- Leave the selection set up Publish to a Single Course (3)
- Choose the Blackboard Server (4) if it is already set-up or choose "add new server".
If this is the first time you’ve used Respondus you’ll need to "add new server"
Adding a new server (UAS Blackboard
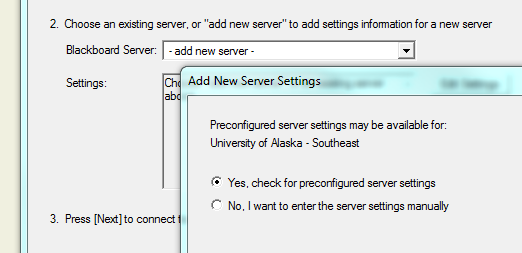
Using the UAS licensed Campus-Wide Respondus program, you’ll be able to add UAS Blackboard as a server by choosing "Yes, check for preconfigured server settings.
Leave the selection on "Yes" and click Next.
If you are unsuccessful in setting up a server it is still possible to save the exam or pool as a "zip" file and upload it manually.
Additional steps for uploading this zipped file into Blackboard can be found here: http://blackboardhelp.wordpress.com/2011/01/28/import-a-test/
Setting up UAS Blackboard on the Campus Wide licenses Respondus

Give the server a name (such as UAS Blackboard) and enter your UA username and password (the same as you use to login to UAS Online). Check the box to save if you wish. Click Next to continue. The server will attempt to connect. If it reports success then you are all set up! Click Next and Finish.
If there are problems it may be that
- Your username and password are incorrect (or you have not yet visited a UAS Blackboard course and are not in the Blackboard database).
- The settings have changed and the set-up file is out of date
Uploading a Test using Respondus
Once the Blackboard server is set up, choose that server and click Next
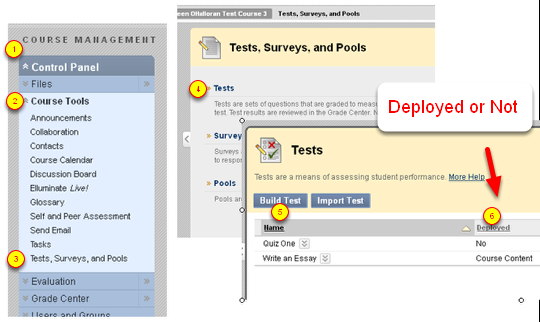
Uploading a test or pool but not deploying it
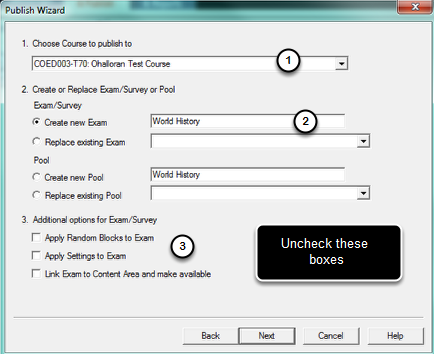
To upload the test to Blackboard but not deploy it
(1) Choose the course
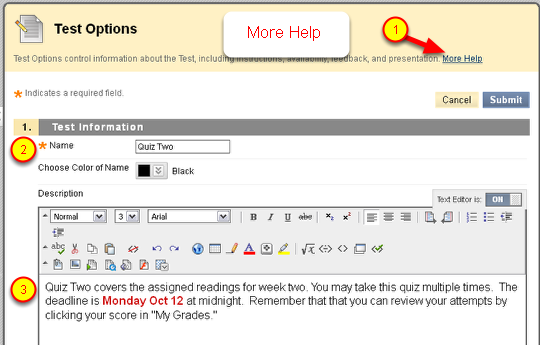
(2) Give the test (exam) or pool a new name
(3) Uncheck all the boxes for deploying the test
Click Next and when success is reported click Finish. The test or pool will be uploaded to the Test Manager – you will still need to deploy it.
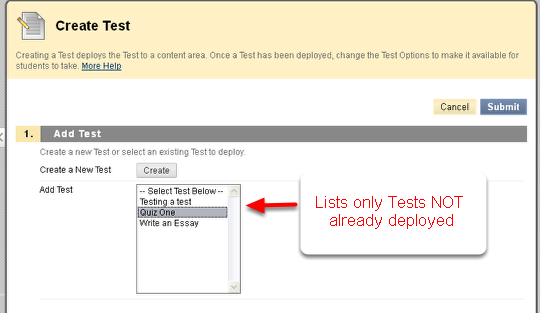
To upload and deploy a Test at the same time, you’ll first need to go the Settings tab in Respondus and choose the Test Options. Then you can publish. You’ll be given a chance to browse and select the Content Area into which you want to deploy the test.
More about Respondus: When you create a test or pool in Respondus it creates and saves a "Respondus File" – usually in a folder called Respondus Projects in My Documents. You can re-open this file to edit or re-upload your test rather than starting from the Word file. There are many more options in Respondus (such as printing tests, retrieving tests and so forth). Use the Help documentation within Respondus to learn more.