UAS Course Linker – How to link sections together

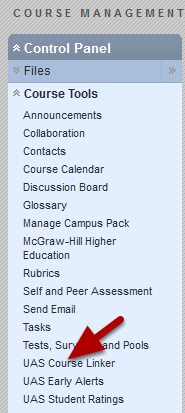
You can link course sections together using the UAS Online Course Linker tool. This is found in the Control Panel under Course Tools and alphabetically as "UAS Course Linker"

Once two sections are linked (or "stacked") the course list will roll over and all your students will be in the main course site and their grades will be in that gradebook. This is the only site you will edit. Course Materials and Grades will NOT be copied over if you unlink the courses later – you should only do this before the start of the semester if you change your mind because the student’s work will not be copied to the unlinked sections.

If you wish to COPY course material between course sites (but leave the gradebooks separate) then you can set up one course site with all the materials you want (and even set up columns and weighted totals in the gradebook) then use the Course Copy (found in Control Panel > Packages and Utilities> Course Copy). Be sure and choose "Copy to an Existing Course" then browse and find the course/section you want to copy to. Check off the boxes for what you wish to copy – it doesn’t hurt to check everything. If you copy Content Areas which contain Tests, Assignments etc. that are linked to the Grade Center you must also copy the Grade Center – this doesn’t copy student records, only the structure of the gradebook.

What happens – before course are linked.

media_1346352189888.png

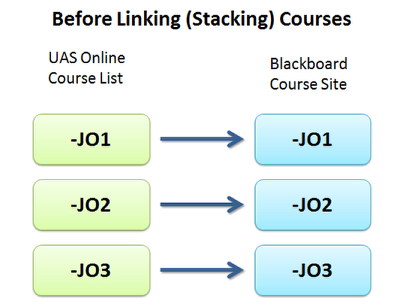
If you have several sections of the same course then a separate course site will be created for each. In this example there are three sections. There will be three course names listed on UAS Online and they will be linked to three separate Blackboard Course sites. Many times the course material you are posting on the course sites will be the same for all three sections. To avoid having to post everything three times you can link the courses together and have all the students in one course site. This will also put all of the students in the same gradebook.

After courses are linked

media_1346352374322.png

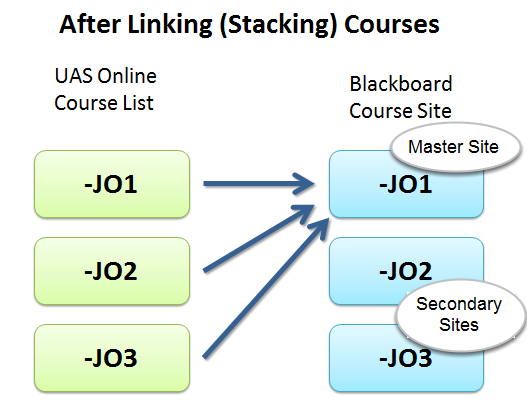
After the courses are linked the students will see all of their separate sections on their UAS Online course list and you will still see all three section names – but clicking on any one gets you to the "master" course site (J01 in this example) – the one you are going to edit and add content to. The linked course (JO2 and J03) will remain empty and inaccessible (unless you unlink the courses as shown below). Let’s call those sites the seconday sites.

How to Link Courses

media_1346352663042.png
  • Designate one course as the "master" course site – let’s say this is JO1
  • Go to the secondary course sites (J02 or JO3 in this case)
  • Go to the Contol Panel (under the course menu on the left)
  • Click on Course Tools then UAS Course Linker

Enter the name of the "master" course site

media_1346352941150.png

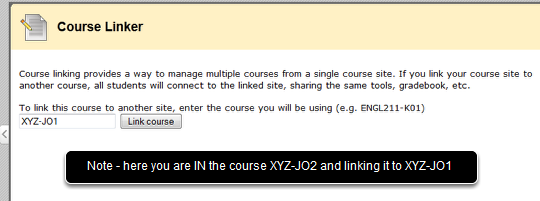
While you are in the secondary course site (JO2 for example);

  • Enter the name of the master site, e.g., XYZ-JO1
  • Click Link Course

While you are still visiting this site it will still be the XYZ-JO2 (secondary) site but if you exit and return again via the UAS Online course menu you will now be in the master site (XYZ-JO1)

  • Repeat for any additional sections you wish to link (stack)

All of your students to the gradebook and user list in the master section. When students click on their course names they will automatically go to the master section.

Unlinking Course Sites

media_1346353698859.png

You can unlink course sites using the UAS Course Linker tool.
However none of the content and student records will be copied back to the now unlinked "secondary" sections.
You will usually not want to unlink sections after the start of the semester.

If you do decide to unlink the sections:

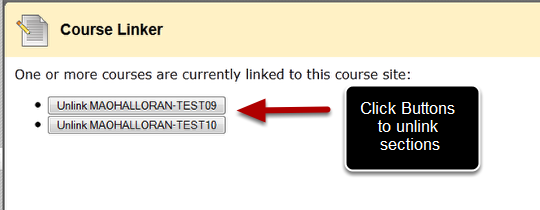
  • Go the Control Panel > Course Tools > UAS Online Course Linker
  • Click the buttons to unlink the sections

Now UAS Online will direct both you and your students to the Blackboard course site corresponding to their section.

Posting a Voicethread in Blackboard

Voicethread is an online program that lets you upload pictures, video and document and add narration via microphone and webcam. You can permit others to comment on your Voicethread by text, audio or webcam. They can even draw on the slides while commenting.

A free voicethread account gives you 75 MBytes of storage space and 30 webcam minutes. There are also paid individual, departmental and site licenses.

The voicethread website (www.voicethread.com) has excellent instructions for creating a Voicethread. This lesson explains how to post your voicethread in Blackboard and allow students to comment.

Setting Playback Options

media_1345141770444.png

(1) Click on "My Voice" and then the menu button under the Voicethread you wish to post in your class
(2) Click Edit

Click on Playback Options

media_1345142438594.png

You’ll find this button near the bottom of the page once you are editing your Voicethread.
Note the other buttons here too – we’ll also need to use them.

Playback Options

media_1345142648282.png

(1) By default there is a 4 second delay between slides – you may want to reduce this to a smaller number to make the thread play more smoothly
(2) Generally you don’t want the thread to autostart when posting in your class – uncheck this
(3) You can decide whether students can download or export your thread. Be careful about this when using copyright material under "Fair Use"
Click the boxes to set or unset you options, then Save

Publishing Options

media_1345142933508.png

(1) You’ll need to check "Allow Anyone to View" to share the Voicethread with your students. If you post teh link in your Blackboard class in an area restricted to students (Guests are denied) then only your students will be able to view the Voicethread.
(2) You can decide whether you want your students to Comment on the thread. Moderate comments means you’ll have to approve them before they are visible.
(3) Don’t check Show on Browse Page if you don’t want other people to be able to search and find it

If you want to post a link to your Voicethread

media_1345143158184.png

(1) Click the Share button
(2) Click Get a Link – you’ll be able to copy the link and also decide the commenting options

You can paste this link in an email or include it on Blackboard. To add a link on Blackboard:

  • In any content area – choose "Create Content" then "URL" or "External Link" for the type of content.

To embed the Voicethread in Blackboard

media_1345143248627.png

Embedding a Voicethread means it will show up directly on the Blackboard page.

  • Click the Embed button at the bottom of the page.
  • After clicking the Embed button you’ll see window that allows you to copy the Embed code.
  • Click Copy this

Go to your Blackboard Class and to the content are or folder where you want to post the Voicethread

media_1345143562222.png

In the content area or folder you choose, use the Build Content menu (1) and choose Item (2)

Go to HTML source mode ("code view") to paste the Embed code

media_1345143653141.png

(1) Give your Item a name
(2) Click on the symbol that looks like < > to switch to HTML source mode
(3) Note – if you don’t see all the editing buttons then you may need to click on the triangular arrows to the left to expand the toolbars. Some of the editing does not work in Safari – it is recommened that you use Firefox or Chrome on a Mac.

Paste the Embed code in the window.

media_1345143917984.png

(1) When you are in "code view" the button that looks like two brackets should be depressed < > and you should see a message that you are in HTML source mode.
(2) Paste the Embed code into the textbox
(3) You can paste by typing Cntrl-V or by using the button that looks like a clipboard


Submit!

media_1345144245858.png

Click Submit. Now your Voicethread should appear on the page! It’s a good idea to view it using a test-student account to make sure you’ve set the Publishing options – if your students can’t view it you may have forgotten to set "Everyone can View" as an option.