As long as your courses are on the same server, you can use Course Copy to copy a course from semester to semester.
(Note that on UAS Blackboard, BBSANDBOX and BBDEV are actually separate servers – in that case you would need to export/import to move courses between servers).
The course shell for your new course will need to have already been created in order to do a course copy.
Older UAS Online courses (from before Fall 2012) must be exported/imported – read more about that here: http://www.uas.alaska.edu/idc/transition/
Go to your old Blackboard Course
- Go to your old Blackboard course
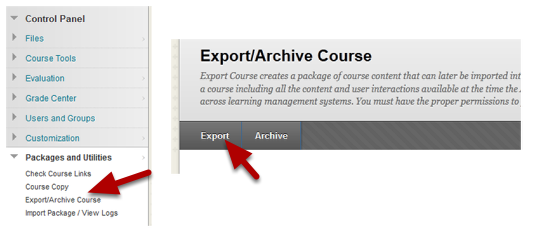
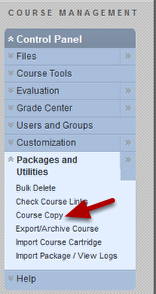
- Go to the Control Panel and Click on Packages and Utilities
- Choose Course Copy
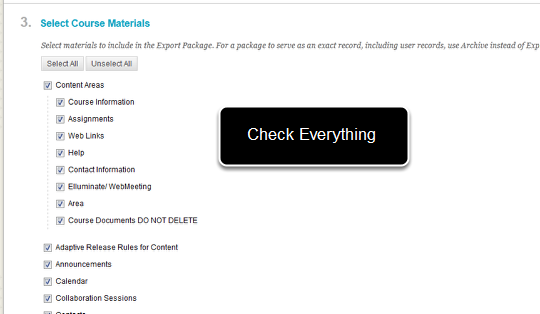
Export Everything
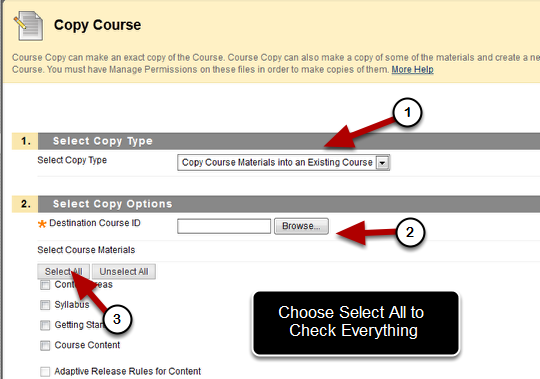
- Choose Copy Course Material into an Existing Course
- Browse and find the NEW course into which you wish to copy (more about that below)
- Click Select All to choose everything.
The safest way to export is to check everything! It doesn’t hurt to check things you don’t use and it can cause big problems to export content areas that contain tests, discussion board or anything linked to the gradebook without also exporting the grade center – it is easier to delete things you don’t need later than to try and repair things from a partial export.
Read the next to sections before clicking Submit
Choosing the new course from your list

To choose the correct NEW course to copy to use the following information
(1) Course ID – this contains semester information (201203 is Fall 2012, 201301 is Spring 2013 where 1=Spring, 2=Summer, 3=Fall)
(2) Course Name
CAUTION – if you have uploaded zipped packages (Softchalk Lessons, other HTML packages etc)
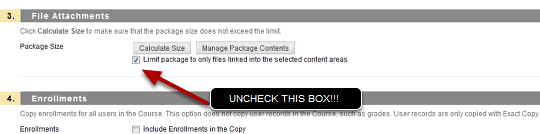
If you have files that are not directly linked from your content areas (for example a Softchalk lesson or HTML files prepared from Powerpoint which actually contain multiple files or images, then you’ll need to uncheck the box that says "Limit Package to only files linked to in the selected content areas" This will copy all the files in your Files area.
In the past there have also been "permissions issues" for copied files that are not directly linked to from the Blackboard content areas. To read more about zipped packages and permissions go here: http://blackboardhelp.wordpress.com/2011/01/11/upload-a-zipped-package-file/
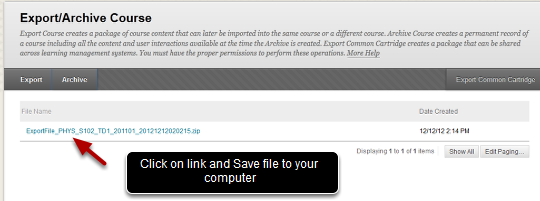
Click Submit to initiate the course copy.
Your export has been queued

You’ll get a message that your course copy has been queued and you’ll get an email when its done. The amount of time this takes can vary.
DO NOT EDIT THE COURSE UNTIL THE COPY PROCESS IS COMPLETE – in fact it can be a good idea to wait for half an hour after you get the email.
Cleaning up your course site
The content areas from your old course will be imported into your new course –
- Content will be copied into any content areas with the same name – for example, if you had content in Syllabus, Getting Started or Course Content it will be copied there (since those areas exist in the default course site
- A new menu item will be created for any new content areas you made or any you renamed – for example if you renamed Course Content to Course Assignments then a new entry on the course menu will be created. The new items will be located at the bottom of the course menu.
You’ll need to re-order them and control their availability. If you want to prohibit Guest from viewing some content then you’ll need to choose "Deny Guests" next to the course menu entries for those content areas. If you want to hide any content area while you are updating it then choose "Hide Link" from the drop-down menu next to the menu item name.
Discussion posts may also be imported with your course. These will be relabeled as Anonymous. You will need to go into the Discussion forum, Select All of the posts and delete them to empty your discussion forums.