Export from Blackboard, Import to Blackboard

Note: January 2013: Course Copy is temporarily (we hope) not working – use the Export/Import – Export from your old class, then Import to your new class.

To move a class from one server to another you need to Export the course from the old server then import to the new server. This lesson describes how to Export from Blacboard and Import to another Blackboard. This involves saving a zipped file to your computer from the old server then importing that same zipped file to the new server.

Go to your old Blackboard Course
wpid468-media_1357765398099.png
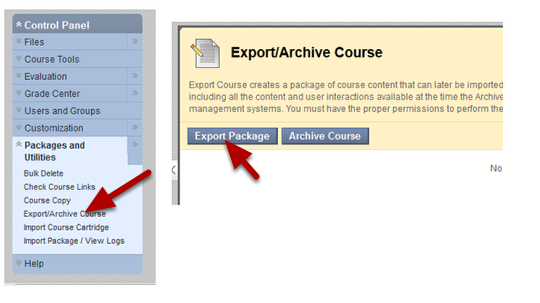
  • Go to your old Blackboard course
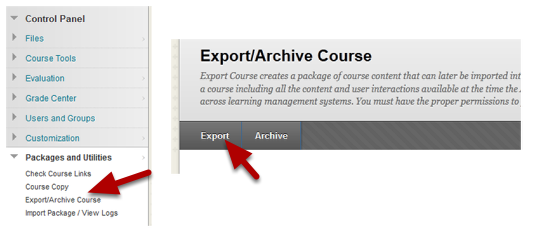
  • Go to the Control Panel and Click on Packages and Utilities
  • Choose Export/Archive Course
  • When that panel opens, click on the Export link

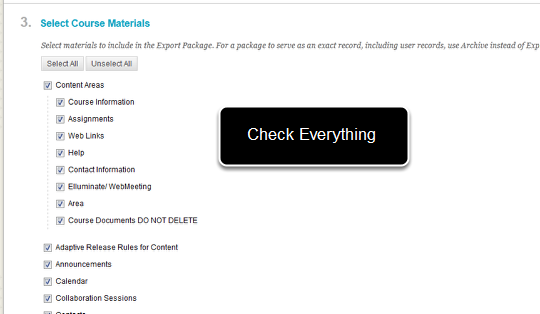
Export Everything
wpid469-media_1357765443520.png

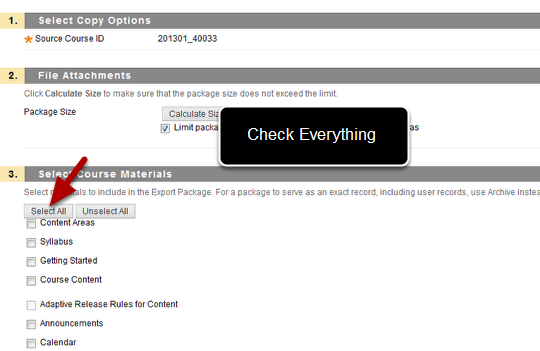
The safest way to export is to check everything! It doesn’t hurt to check things you don’t use and it can cause big problems to export content areas that contain tests, discussion board or anything linked to the gradebook without also exporting the grade center – it is easier to delete things you don’t need later than to try and repair things from a partial export.

If you are sure you know what you want to export you don’t have to check everything – just be sure that if you export the grade center you export all content areas or discussions that have quizzes, graded discussions, assignments, etc linked to the grade center, and visa versa.

Scroll down and click Submit after checking everything.

Your export has been queued

wpid470-media_1357765569949.png

You’ll get a message that your export has been queued and you’ll get an email when its done. The amount of time this takes can vary.
Note – you don’t have to stay on this page – you can go to other courses and set up the export for them as well.

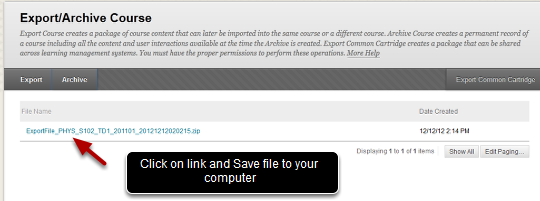
After you get your email notification, save the zipped file to your computer

wpid471-media_1357765595766.png

After you get your email notification return to the old Blackboard course, click on the link shown and save the zip file to your computer.

Be sure and save the zip file in a timely manner – the link will disappear after a while.
It does’t matter if you rename the file as long as you keep the zip extension.

Go to new course
wpid441-media_1355355013922.png

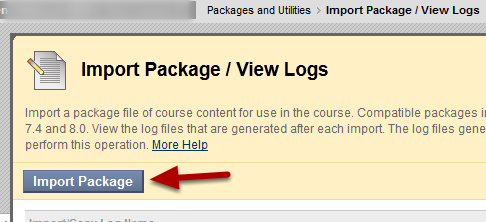
Go to your new Blackboard course

  • Go to Control Panel, Packages and Utilities
  • Go to Import Package/View Logs
  • When the panel loads, click on Import Package

Import the zipped file you previously saved
wpid442-media_1355355085114.png
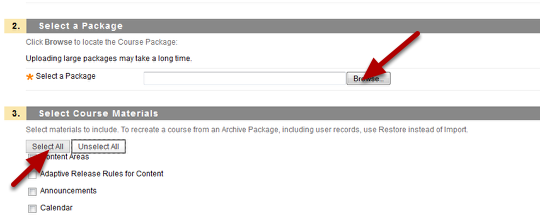
  • Browse and find the zipped file that you previously saved.
  • Click Select All to import all parts of the package (safest choice)
  • Scroll down and click Submit

Again it will take a while for the process to complete. You’ll get an email when it is finished. DO NOT EDIT YOUR COURSE WHILE THE PROCESS IS UNDERWAY.

A link to a log file will appear in the Import/View logs panel. The log file will may have some errors and warnings. The best thing is to view your imported content and contact the helpdesk with information about which course/semester you are working with. Problems can arise if you have a) Publishers content which is copyright – in that case you may need to contact the publisher to get a new course package or b) unusual characters in tests or other issues.

Cleaning up your course site
wpid472-media_1357765815169.png

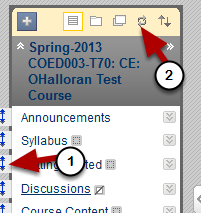
The content areas from your old course will be imported into your new course – you’ll need to re-order them and control their availability.

  • Discussion posts may also be imported with your course. These will be relabeled as Anonymous. You will need to go into the Discussion forum, Select All of the posts and delete them to empty your discussion forums.
  • When re-ordering things on the course menu "grab" the up/down arrow to the left of the menu item name labeled (1) above (not the name itself)
  • If you delete things from your course menu you’ll need to "refresh" (labeled (2) above) in order to see what is deleted.
  • If you used the campus pack blog/wiki you may need to export that seperately (from within the wiki or blog) and import (by creating a new campus pack blog/wiki and then choosing Import.

Add a Webmeeting to your UAS Online Portfolio Page

This tutorial explains how to add a Webmeeting to your UAS Online Portfolio page. This webmeeting can be set so anyone can join it – use it to host Office Hours for multiple classes at the same time or to meet with advisees or colleagues. After creating the webmeeting you can send the link to anyone in an email or post it as an External Link or URL in Blackboard.

Go to your UAS Online Portfolio

media_1346448492626.png

Any UA employee or student who has an account on UAS Online (http:/www.uas.alaska.edu/online ) has a portfolio automatically created for them. After you login to UAS online (same login as your UAS email ) you can get to your Portolio by clicking on the link in the upper right.

Add new sub-page

media_1346448615141.png

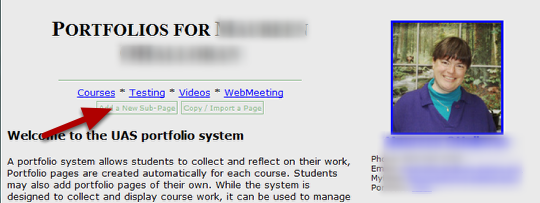
Once your’re in your portfolio you will want to add a new Sub-page. This is because we’re going to change the permissions of that page, so you may not want it on the front page of your portfolio.

  • Click on the button "Add a New Sub-Page"

Adjust Webmeeting Settings

media_1347481374631.png

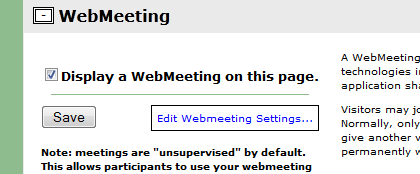
After you have added the Webmeeting you can Edit Webmeeting Settings as you like. If you want to change the settings you’ll

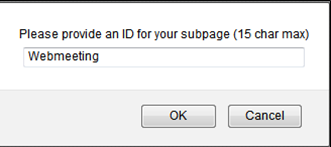
Give the new page an ID

media_1347475626754.png

Type in an ID for the new page (Webmeeting for example)

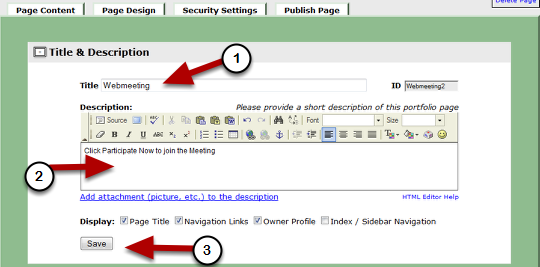
Give the page a name and description

media_1347475703182.png

(1) Give the page a Name (required)
(2) Add Description (optional)
(3) Click Save

Make sure you click Save before the next step!

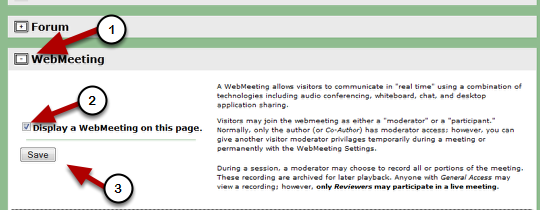
Add the Webmeeting

media_1347481088300.png

Scroll down until you see the Webmeeting section
(1) Click the plus sign to expand the section
(2) Check to display a Webmeeting on this page
(3) Click Save

Make sure you click Save before the next step!

Change Security Settings

media_1347475853908.png

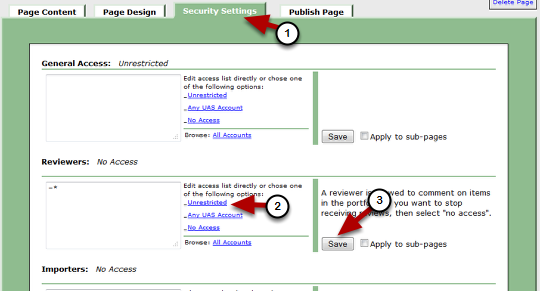
(1) Click on the Security Settings tab
(2) In the Reviewers area click "Unrestricted" – without this others won’t be able to join your meeting
(3) Click Save

Use the "breadcrumbs" to navigate to your new page

media_1347476357758.png

In the upper left of the portfolio page, click on the name of your new page (Webmeeting in this example) to navigate to the new page.

Get the link to your new page to share with others

media_1357242421056.png
  • The best way to copy the link to your new page is to right-click on the page link (cntrl-click on a Mac) and "copy link location" or "copy shortcut" (the exact wording will depend on your browser
  • If you want to copy only the webmeeting link (not the link to the whole page) then right-click on the "Participate Now" link and copy that
  • After copying the link you can paste it into an email or you can create an External Link or URL on Blackboard

Blackboard Course Copy

As long as your courses are on the same server, you can use Course Copy to copy a course from semester to semester.
(Note that on UAS Blackboard, BBSANDBOX and BBDEV are actually separate servers – in that case you would need to export/import to move courses between servers).

The course shell for your new course will need to have already been created in order to do a course copy.

Older UAS Online courses (from before Fall 2012) must be exported/imported – read more about that here: http://www.uas.alaska.edu/idc/transition/

Go to your old Blackboard Course

wpid444-media_1355355859571.png
  • Go to your old Blackboard course
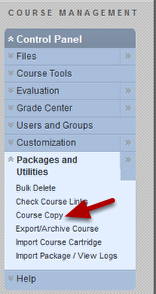
  • Go to the Control Panel and Click on Packages and Utilities
  • Choose Course Copy

Export Everything

wpid445-media_1355355948691.png
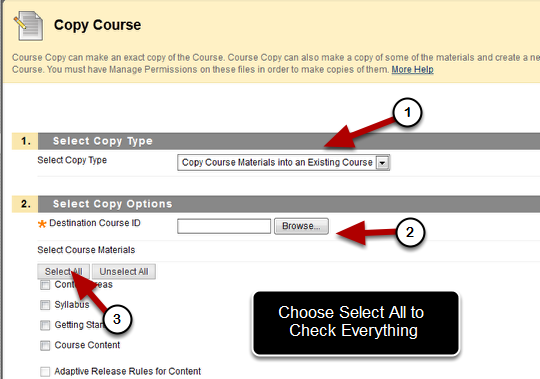
  • Choose Copy Course Material into an Existing Course
  • Browse and find the NEW course into which you wish to copy (more about that below)
  • Click Select All to choose everything.

The safest way to export is to check everything! It doesn’t hurt to check things you don’t use and it can cause big problems to export content areas that contain tests, discussion board or anything linked to the gradebook without also exporting the grade center – it is easier to delete things you don’t need later than to try and repair things from a partial export.
Read the next to sections before clicking Submit

Choosing the new course from your list

wpid446-media_1355356283212.png

To choose the correct NEW course to copy to use the following information
(1) Course ID – this contains semester information (201203 is Fall 2012, 201301 is Spring 2013 where 1=Spring, 2=Summer, 3=Fall)
(2) Course Name

CAUTION – if you have uploaded zipped packages (Softchalk Lessons, other HTML packages etc)

wpid447-media_1355356821639.png

If you have files that are not directly linked from your content areas (for example a Softchalk lesson or HTML files prepared from Powerpoint which actually contain multiple files or images, then you’ll need to uncheck the box that says "Limit Package to only files linked to in the selected content areas" This will copy all the files in your Files area.

In the past there have also been "permissions issues" for copied files that are not directly linked to from the Blackboard content areas. To read more about zipped packages and permissions go here: http://blackboardhelp.wordpress.com/2011/01/11/upload-a-zipped-package-file/

Click Submit to initiate the course copy.

Your export has been queued

wpid448-media_1355356976701.png

You’ll get a message that your course copy has been queued and you’ll get an email when its done. The amount of time this takes can vary.
DO NOT EDIT THE COURSE UNTIL THE COPY PROCESS IS COMPLETE – in fact it can be a good idea to wait for half an hour after you get the email.

Cleaning up your course site

The content areas from your old course will be imported into your new course –

  • Content will be copied into any content areas with the same name – for example, if you had content in Syllabus, Getting Started or Course Content it will be copied there (since those areas exist in the default course site
  • A new menu item will be created for any new content areas you made or any you renamed – for example if you renamed Course Content to Course Assignments then a new entry on the course menu will be created. The new items will be located at the bottom of the course menu.

You’ll need to re-order them and control their availability. If you want to prohibit Guest from viewing some content then you’ll need to choose "Deny Guests" next to the course menu entries for those content areas. If you want to hide any content area while you are updating it then choose "Hide Link" from the drop-down menu next to the menu item name.

Discussion posts may also be imported with your course. These will be relabeled as Anonymous. You will need to go into the Discussion forum, Select All of the posts and delete them to empty your discussion forums.

Export from UAF Blackboard, Import to UAS Blackboard

To move a class from one server to another you need to Export the course from the old server then import to the new server. This lesson describes how to Export from UAF Blacboard and Import to UAS Blackboard. This involves saving a zipped file to your computer from the old server then importing that same zipped file to the new server.

Note: Exports from a newer version of Blackboard to an older version do not work well. You should EXPORT from UAF Blackboard before the end of the Fall 2012 semester and SAVE the resulting zipped file to your computer. Then you’ll WAIT until the UAS Blackboard is upgraded (between semesters) and IMPORT that zipped file into you Spring 2013 course.

Now is a good time to save exports from all your UAF courses even if you are not yet teaching them in the spring.

Go to your old UAF Blackboard Course

media_1355353119161.png
  • Go to your UAF Blackboard course
  • Go to the My Courses list (NOT the My UA Courses List)
  • Go to the Control Panel and Click on Packages and Utilities
  • Choose Export/Archive Course
  • When that panel opens, click on the Export link

Export Everything

media_1355353212551.png

The safest way to export is to check everything! It doesn’t hurt to check things you don’t use and it can cause big problems to export content areas that contain tests, discussion board or anything linked to the gradebook without also exporting the grade center – it is easier to delete things you don’t need later than to try and repair things from a partial export.
Scroll down and click Submit after checking everything.

Your export has been queued

media_1355353364727.png

You’ll get a message that your export has been queued and you’ll get an email when its done. The amount of time this takes can vary.
Note – you don’t have to stay on this page – you can go to other courses and set up the export for them as well.

After you get your email notification, save the zipped file to your computer

media_1355354591979.png

After you get your email notification return to the UAF Blackboard course, click on the link shown and save the zip file to your computer.

Be sure and save the zip file in a timely manner – the link will disappear after a while.
It does’t matter if you rename the file as long as you keep the zip extension.

AFTER UAS Blackboard has been upgraded

media_1355355013922.png

After UAS Blackboard has been upgraded (expected to happen before Jan 2 2013) you can import the zipped package,

  • Go to Control Panel, Packages and Utilities
  • Go to Import Package/View Logs
  • When the panel loads, click on Import Package

Note that although UAS Blackboard is upgrading the "look" won’t change to match UAF Blackboard (at least for the Spring semester). Nonetheless, it will be a newer version.

Import the zipped file you previously saved

media_1355355085114.png
  • Browse and find the zipped file that you previously saved.
  • Click Select All to import all parts of the package (safest choice)
  • Scroll down and click Submit

Again it will take a while for the process to complete. You’ll get an email when it is finished. DO NOT EDIT YOUR COURSE WHILE THE PROCESS IS UNDERWAY.

A link to a log file will appear in the Import/View logs panel. The log file will almost certainly have some errors and warnings. The best thing is to view your imported content and contact the helpdesk with information about which course/semester you are working with. Problems can arise if you have a) Publishers content which is copyright – in that case you may need to contact the publisher to get a new course package or b) unusual characters in tests or other issues.

Cleaning up your course site

The content areas from your old course will be imported into your new course – you’ll need to re-order them and control their availability. (In UAF Blackboard course sites where limited to students. UAS Blackboard allows guest and if you want to prohibit Guest from viewing some content then you’ll need to choose "Deny Guests" next to the course menu entries for those content areas.

Discussion posts may also be imported with your course. These will be relabeled as Anonymous. You will need to go into the Discussion forum, Select All of the posts and delete them to empty your discussion forums.

Reviewing an online Test

This tutorial explains how to review the results of an online test. The instructor reviews results through the "Grade Center", and the student reviews results through "My Grades".
Instructor: Go to the Grade Center

wpid407-media_1347299584666.png

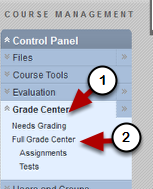
In Control Panel

  • go to Grade Center and then
  • go to Full Grade Center

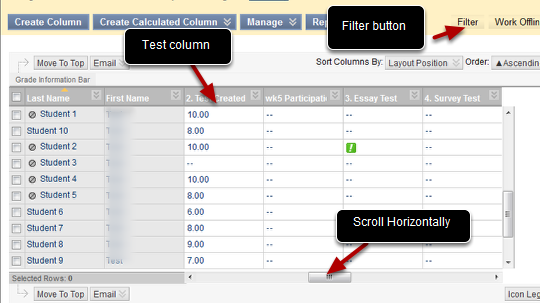
Find the column for the test

wpid408-media_1347301004260.png

Find the column for the test. You can simplify the gradebook view by using the "Filter" function found to the upper right of the grade center. This lets you filter by category. Note – you’ll have to change the filter back to "All Categories" to see the full grade center again.

Viewing Statistics for the whole test

wpid409-media_1347301175204.png

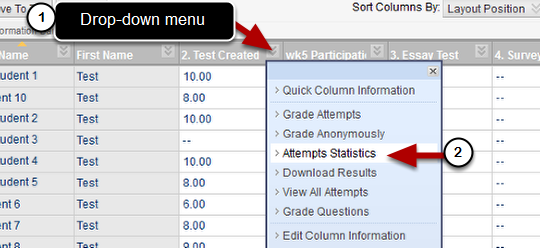
(1) To the right of the column header for the test, find the drop-down menu
(2) Click on the drop-down menu icon then choose Attempts Statistics

You can also "Download Results" – read the instructions carefull to save the results.

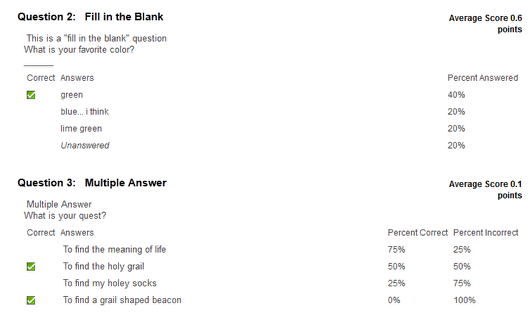
Attempts Statistics

wpid410-media_1347301400324.png

Attempts Statistics will give you a question by question breakdown showing what persentage of students submitted each answer as well as over-all statistics for the test.

View Results for Individual Students

wpid411-media_1347302056577.png

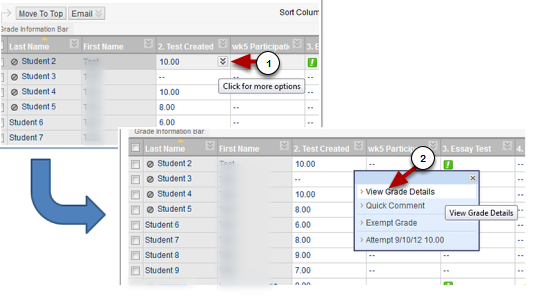
To view individual student grades, go to the first student that has a result in the gradebook. From the drop-down menu next to their score in the column ( (1) this only shows when you move your mouse over that area in the gradebook column) choose (2) View Grade Details.

View attempt for the first student

wpid412-media_1347302347175.png

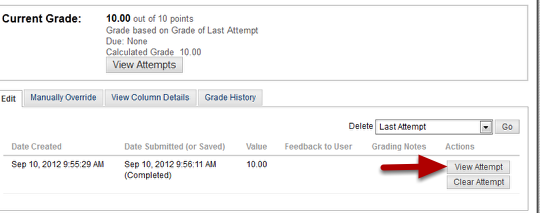
Now click View Attempt for that student.
You’ll only have to do two clicks for the first student – after that it becomes easier!!!

View a students result

wpid413-media_1347302422385.png

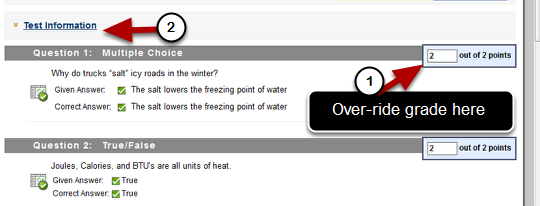
Now you can view an individual students result and over-ride their grade if you would like to (1)

Note also the link that says "Test Information" (2) – this can be important!

Expand Test Information

wpid414-media_1347302560529.png

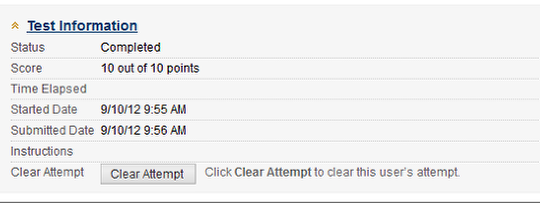
Expanding "Test Information" by clicking on it lets you know how long the attempt took etc. It is also one way to Clear the Attempt or to Submit an Attempt for a student who takes part of the test then either times out or has a glitch while submitting.

Leave Feedback, Continue to next student

wpid415-media_1347302714121.png

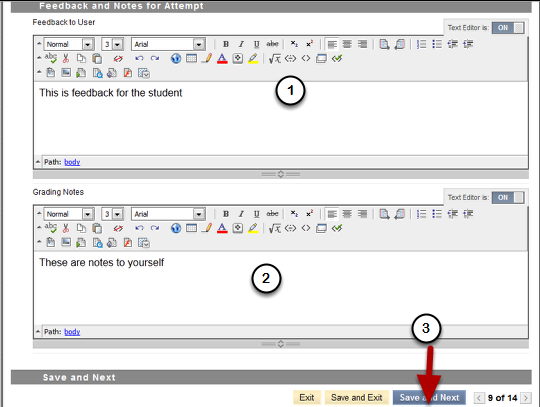
Scroll down while viewing the attempt
(1) You can leave feedback for the student
(2) You can make notes for yourself
(3) At the bottom click "Save and Next" to continue to the next student of "Save and Exit" to return to the Grade Center

Grading Essay Tests

Essay Tests (tests with question type Essay) are graded in the same way. You will of course have to give the grades manually – each question will have a place to enter the score for that question and an individual feedback box for each question.

Entering grade manually

You can enter grades manually from the full grade center view. Just click once or twice on the first row that you want to enter a grade, type the grade and then Enter key.

Do not be too impatient! The grade center takes a bit of time to save the grade and grade history – you’ll see the grade update and your cursor in the next row shortly after you type enter

How students review their grades

wpid416-media_1347303190430.png

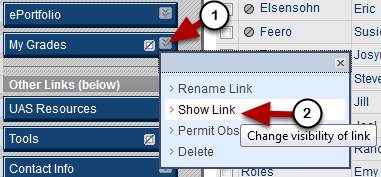
You must make "My Grades" visible before a student can see their grades and feedback – use the drop-down menu next to the My Grades link in the course menu and choose "Show Link" (it will have a square with slash through it next to the menu item name if it is hidden).

Student’s view of My Grades

wpid417-media_1347303270125.png

The student will see all the gradebook "columns" down the page when they view My Grades. The score of their test will be a link (1). The will also see any feedback you have entered (2).

Students can click on the link for the score to view attempt

wpid418-media_1347303565848.png

If students click on the link for their score (then click a secont time on the score on the next page) they can review their test.

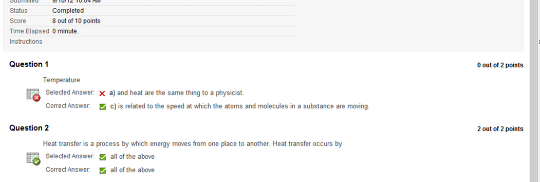
What they see depends on the level of feedback you have set in "Test Options" when you deploy the test – if you have set only "score" then they cannot review the test. You can also choose to show their answers, the correct answers, and general feedback (if the instructor has entered it when making the test).

In the example above both "submitted answer" and "correct answer" have been selected.

Controlling the level of feedback displayed

wpid420-media_1347304015376.png

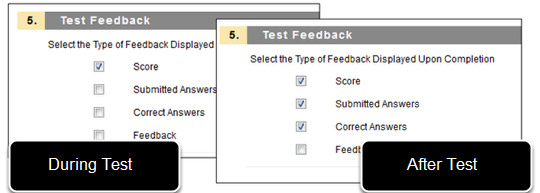
The level of feedback the student sees is determined by the options set at the time they go to My Grades. For example

  • While a test is available you may only wish to show the students their score. They will see this immediately after taking the test and when they go to My Grades.
  • AFTER the test is no longer available – you may wish to show submitted answers and correct answer – you can Edit Test Options and change the level of feedback – now when the go to My Grades they will see the additional information

Note: for Essay test the correct answer is a model answer which the student can compare their own answer to.

Edit Test Options

wpid419-media_1347303872118.png

Change the availability or level of feedback by editing test options – go to the drop-down menu next to the test name and choose "Edit Test Options"

UAS Course Linker – How to link sections together

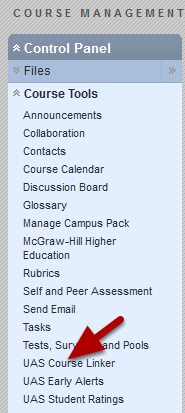
You can link course sections together using the UAS Online Course Linker tool. This is found in the Control Panel under Course Tools and alphabetically as "UAS Course Linker"

Once two sections are linked (or "stacked") the course list will roll over and all your students will be in the main course site and their grades will be in that gradebook. This is the only site you will edit. Course Materials and Grades will NOT be copied over if you unlink the courses later – you should only do this before the start of the semester if you change your mind because the student’s work will not be copied to the unlinked sections.

If you wish to COPY course material between course sites (but leave the gradebooks separate) then you can set up one course site with all the materials you want (and even set up columns and weighted totals in the gradebook) then use the Course Copy (found in Control Panel > Packages and Utilities> Course Copy). Be sure and choose "Copy to an Existing Course" then browse and find the course/section you want to copy to. Check off the boxes for what you wish to copy – it doesn’t hurt to check everything. If you copy Content Areas which contain Tests, Assignments etc. that are linked to the Grade Center you must also copy the Grade Center – this doesn’t copy student records, only the structure of the gradebook.

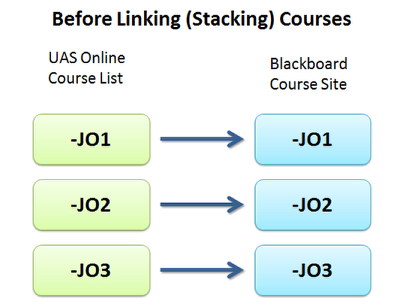
What happens – before course are linked.

media_1346352189888.png

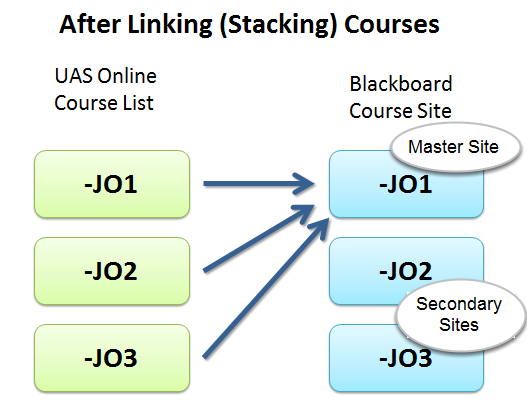
If you have several sections of the same course then a separate course site will be created for each. In this example there are three sections. There will be three course names listed on UAS Online and they will be linked to three separate Blackboard Course sites. Many times the course material you are posting on the course sites will be the same for all three sections. To avoid having to post everything three times you can link the courses together and have all the students in one course site. This will also put all of the students in the same gradebook.

After courses are linked

media_1346352374322.png

After the courses are linked the students will see all of their separate sections on their UAS Online course list and you will still see all three section names – but clicking on any one gets you to the "master" course site (J01 in this example) – the one you are going to edit and add content to. The linked course (JO2 and J03) will remain empty and inaccessible (unless you unlink the courses as shown below). Let’s call those sites the seconday sites.

How to Link Courses

media_1346352663042.png
  • Designate one course as the "master" course site – let’s say this is JO1
  • Go to the secondary course sites (J02 or JO3 in this case)
  • Go to the Contol Panel (under the course menu on the left)
  • Click on Course Tools then UAS Course Linker

Enter the name of the "master" course site

media_1346352941150.png

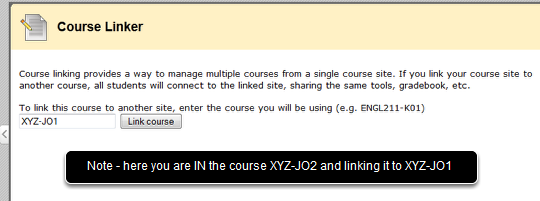
While you are in the secondary course site (JO2 for example);

  • Enter the name of the master site, e.g., XYZ-JO1
  • Click Link Course

While you are still visiting this site it will still be the XYZ-JO2 (secondary) site but if you exit and return again via the UAS Online course menu you will now be in the master site (XYZ-JO1)

  • Repeat for any additional sections you wish to link (stack)

All of your students to the gradebook and user list in the master section. When students click on their course names they will automatically go to the master section.

Unlinking Course Sites

media_1346353698859.png

You can unlink course sites using the UAS Course Linker tool.
However none of the content and student records will be copied back to the now unlinked "secondary" sections.
You will usually not want to unlink sections after the start of the semester.

If you do decide to unlink the sections:

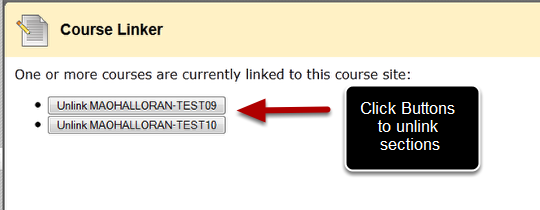
  • Go the Control Panel > Course Tools > UAS Online Course Linker
  • Click the buttons to unlink the sections

Now UAS Online will direct both you and your students to the Blackboard course site corresponding to their section.

Posting a Voicethread in Blackboard

Voicethread is an online program that lets you upload pictures, video and document and add narration via microphone and webcam. You can permit others to comment on your Voicethread by text, audio or webcam. They can even draw on the slides while commenting.

A free voicethread account gives you 75 MBytes of storage space and 30 webcam minutes. There are also paid individual, departmental and site licenses.

The voicethread website (www.voicethread.com) has excellent instructions for creating a Voicethread. This lesson explains how to post your voicethread in Blackboard and allow students to comment.

Setting Playback Options

media_1345141770444.png

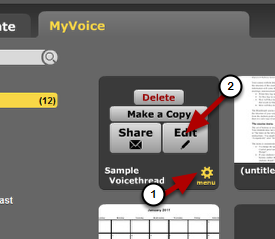
(1) Click on "My Voice" and then the menu button under the Voicethread you wish to post in your class
(2) Click Edit

Click on Playback Options

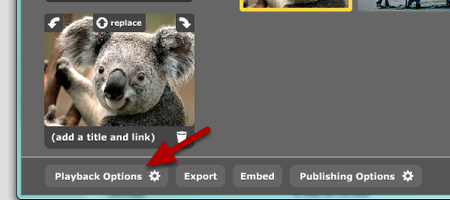
media_1345142438594.png

You’ll find this button near the bottom of the page once you are editing your Voicethread.
Note the other buttons here too – we’ll also need to use them.

Playback Options

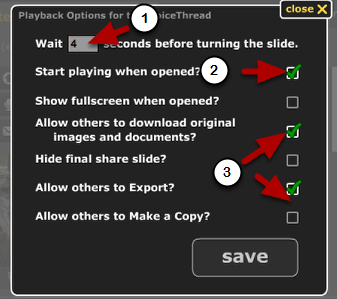
media_1345142648282.png

(1) By default there is a 4 second delay between slides – you may want to reduce this to a smaller number to make the thread play more smoothly
(2) Generally you don’t want the thread to autostart when posting in your class – uncheck this
(3) You can decide whether students can download or export your thread. Be careful about this when using copyright material under "Fair Use"
Click the boxes to set or unset you options, then Save

Publishing Options

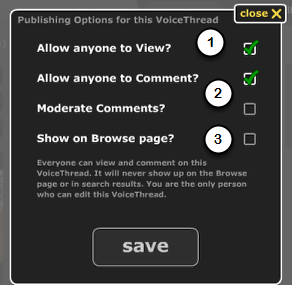
media_1345142933508.png

(1) You’ll need to check "Allow Anyone to View" to share the Voicethread with your students. If you post teh link in your Blackboard class in an area restricted to students (Guests are denied) then only your students will be able to view the Voicethread.
(2) You can decide whether you want your students to Comment on the thread. Moderate comments means you’ll have to approve them before they are visible.
(3) Don’t check Show on Browse Page if you don’t want other people to be able to search and find it

If you want to post a link to your Voicethread

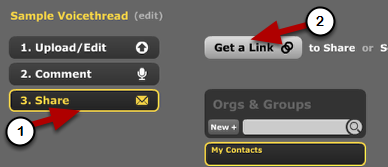
media_1345143158184.png

(1) Click the Share button
(2) Click Get a Link – you’ll be able to copy the link and also decide the commenting options

You can paste this link in an email or include it on Blackboard. To add a link on Blackboard:

  • In any content area – choose "Create Content" then "URL" or "External Link" for the type of content.

To embed the Voicethread in Blackboard

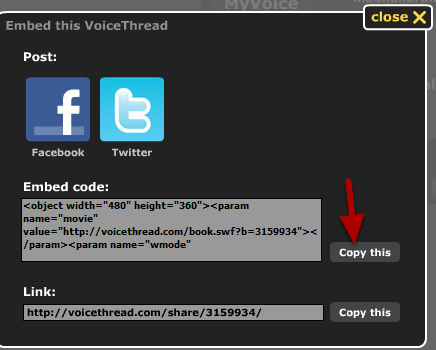
media_1345143248627.png

Embedding a Voicethread means it will show up directly on the Blackboard page.

  • Click the Embed button at the bottom of the page.
  • After clicking the Embed button you’ll see window that allows you to copy the Embed code.
  • Click Copy this

Go to your Blackboard Class and to the content are or folder where you want to post the Voicethread

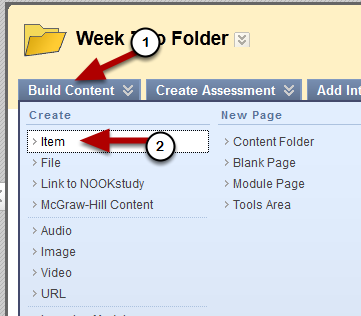
media_1345143562222.png

In the content area or folder you choose, use the Build Content menu (1) and choose Item (2)

Go to HTML source mode ("code view") to paste the Embed code

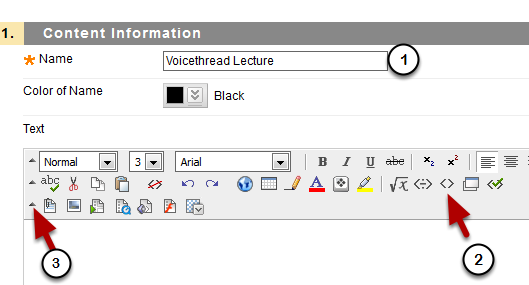
media_1345143653141.png

(1) Give your Item a name
(2) Click on the symbol that looks like < > to switch to HTML source mode
(3) Note – if you don’t see all the editing buttons then you may need to click on the triangular arrows to the left to expand the toolbars. Some of the editing does not work in Safari – it is recommened that you use Firefox or Chrome on a Mac.

Paste the Embed code in the window.

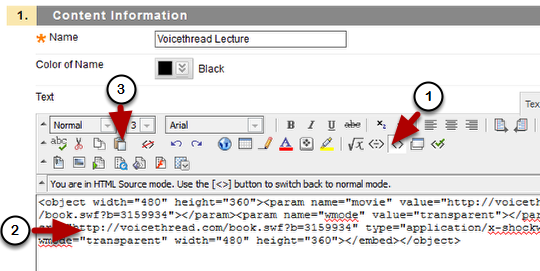
media_1345143917984.png

(1) When you are in "code view" the button that looks like two brackets should be depressed < > and you should see a message that you are in HTML source mode.
(2) Paste the Embed code into the textbox
(3) You can paste by typing Cntrl-V or by using the button that looks like a clipboard


Submit!

media_1345144245858.png

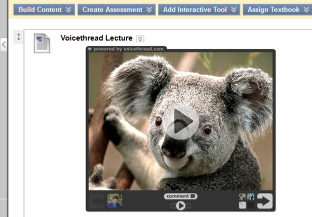
Click Submit. Now your Voicethread should appear on the page! It’s a good idea to view it using a test-student account to make sure you’ve set the Publishing options – if your students can’t view it you may have forgotten to set "Everyone can View" as an option.

Getting Started with Respondus

This tutorial explains how to use Respondus to convert a Word file into a test which which can be imported into Blackboard. UAS has a site license for Respondus, which is a Windows program. Contact the helpdesk for assistance in installing the program.

Set personality to Blackboard 7.x-9.x

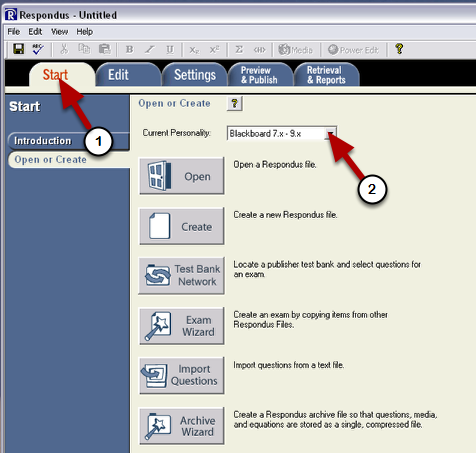
wpid330-media_1340056286597.png

Start Respondus.
(1) Make sure you are on the "Start" tab.
(2) Set the "personality" to Blackboard 7.x-9.x

Getting Help

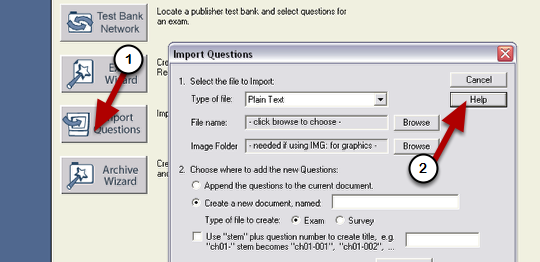
wpid332-media_1340057948803.png

The Help in Respondus is context sensitive. The easiest way to find the "Help" for importing questions is to click on Import Questions then click on Help in the dialog box that opens up. Click on links in the Help to find help for:

  • The Standard Format for Importing Documents
  • Importing Images with Questions

Create an Exam using Word (.doc or .docx) or as a Rich Text Format file (.rtf)

wpid331-media_1340056878754.png

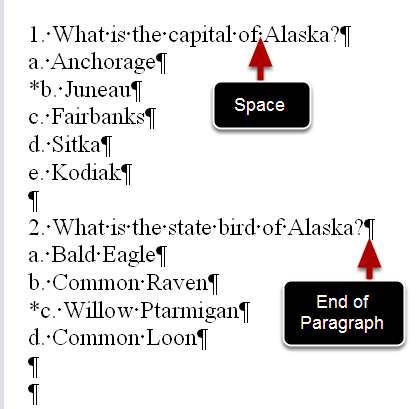
Creating an Exam File in Word. A variety of question types can be used. This tutorial will discuss the most common ones. To learn more about the different options, Click on the Import Questions button in Respondus and then click on Help in the dialog box that opens.

Multiple Choice: Simply type the question as shown above. Note that "show hidden characters" in Word has been turned ON. This means that spaces are shown as dots and the end of paragraphs by the special character that looks like a backwards P.

  • Each question has a number followed by either a period or a close-parenthesis and a single space: 3. or 3)
  • Each answer has a letter followed by a period or close-parenthesis and a single space: b. or b)
  • The correct answer is preceded by an asterisk: *
  • There should be no spaces in front of the leters and numbers
  • Do NOT let Word use auto-numbering (turning the numbers or letters into a automatic list). If autonumbering starts you can type Control-Z (undo) to cancel it.

You can insert pictures in your questions by inserting them in the Word document in a new paragraph after the question. Note that the picture must be a single image file. You cannot create a picture or label it using the Word drawing tools. One way to create a single image file of a picture you wish to label is to insert the picture in a separate Word or Powerpoint document, use the drawing tools to label it, and then use a screen capture program like Snag-it or Jing ( www.jingproject.com ) to select the area around the picture, make a screen capture, and then save the image to a file.

If you are starting with a Word file that is supplied by a publisher, then you can also indicate answers by listing them at the end of the document – see the Respondus Help for more information.

Other question types

wpid333-media_1340058213050.png

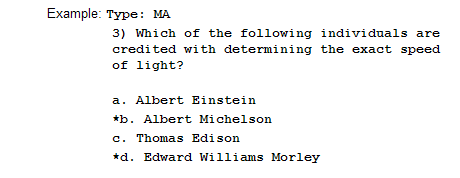
Multiple choice is the default quesion type. Other question types must be labeled. You do this by including the text "Type: X" above the question where the word Type is followed by a colon and "X" indicates the question type. You must insert this text for EVERY question that is not a multiple choice question. Even if you have several of the same questiont types in a row, the designation "Type: X" must precede EVERY question. Some question types include:
Essay: Type: E
Multiple Answer (more than one correct answer): Type: MA
Fill in the Blank: Type: F
Matching: Type: MT
Ordering: Type: ORD

In is also possible to include feedback for questions. Additional information about formatting question types and indicating answers and feedback can be found in the Respondus Help.

Importing the Word File into Respondus

wpid334-media_1340058774283.png

Once your exam has been typed up you will need to save and close your Word file. (You don’t have to close Word, just that particular document).
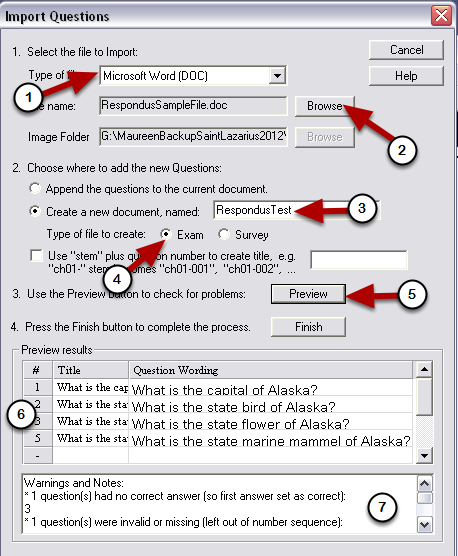
You will start Respondus and click Import Questions
(1) Choose the type of file (correct version of Word)
(2) Click Browse and find your file
(3) Type a name for the "Respondus File" that will be created by this program
(4) Choose Exam or Survey (surveys are the same as exams but do not have correct answers)
(5) Click Preview

In the Window below you’ll see the questions that were imported and Warnings and Notes below.

  • Warning: Questions with duplicate titles. This can be ignored – if you didn’t explicitely give the question a title then Respondus uses the first words for a title. Some of your questions may begin with the same words.
  • Warning: X questions had no correct answers (with questions listed below) – do not ignore this one, you either forgot to indicate an answer or it is formatted incorrectly
  • Warning: X questions were invalid or missing – this should not be ignored either. In this case the number of questions is also wrong, so this indicates what is probably a formatting error.

Do not close Respondus or this dialog box yet!

Re-open the Word file

wpid335-media_1340059584069.png

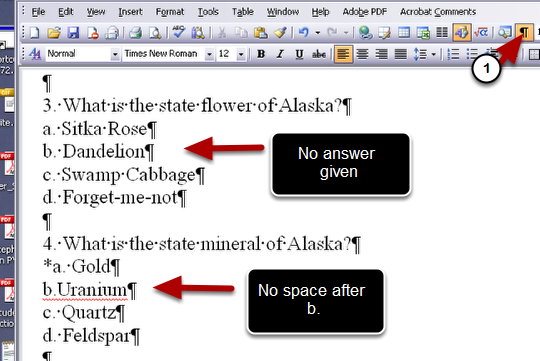
Note the question numbers which had possible errors. Without closing the "Import Questions" dialog box, switch back to the Word document. This can easily be done if you did not close Word (just the document) – You can easily find the Word exam file in your most recently opened documents.

Go the the question(s) where there were possible errors. You’ll find the errors most easily if you "turn on" the ability to see unprinted (invisible) characters using the backwards "P" button (1).

In the example above, there was no answer given for question "3" and question "4" is not formatted correctly because there is no space after the "b". A tab would not be correct in this case either – it must be a space. This is why showing the invisible characters is helpful

After you have edited the Word document to correct it, save the document and then close it (but do not close Word in case you need to come back).

Go back to Respondus

wpid336-media_1340059704461.png

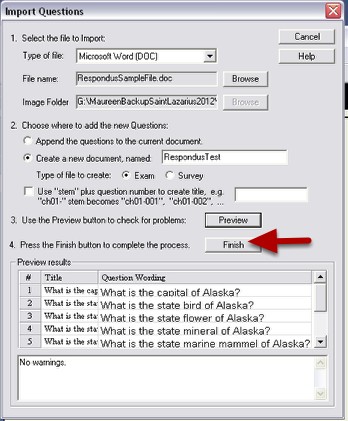
Go back to Respondus. If you did not close the Import Questions dialog box, you simply need to click "Preview" again.

If everything has been cleared up, you can click "Finish"

Preview your questions

wpid337-media_1340059776978.png

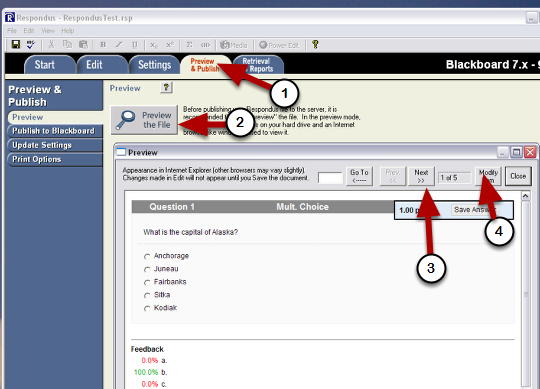
Click on the Preview and Publish tab(1), then on Preview the File(2). Click through to view each question (3) If you find an error you can click "Modify Item" to edit (4). Click Close when you are done.

When you are ready you can click "Publish to Blackboard"

Publish to Blackboard

media_1344290961428.png
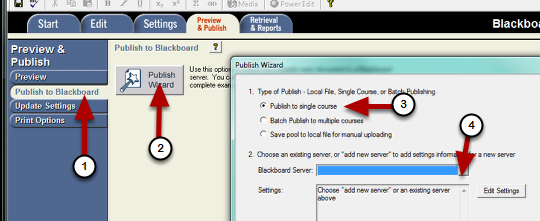
  • Click on the Publish to Blackboard button on the left (1) then on Publish Wizard (2).
  • Leave the selection set up Publish to a Single Course (3)
  • Choose the Blackboard Server (4) if it is already set-up or choose "add new server".

If this is the first time you’ve used Respondus you’ll need to "add new server"

Adding a new server (UAS Blackboard

media_1344291159070.png

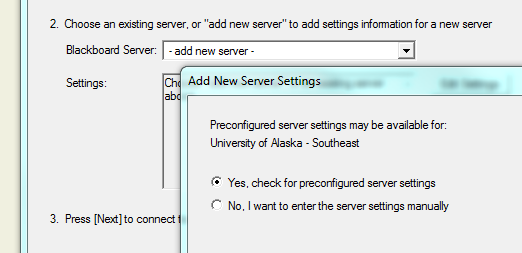
Using the UAS licensed Campus-Wide Respondus program, you’ll be able to add UAS Blackboard as a server by choosing "Yes, check for preconfigured server settings.

Leave the selection on "Yes" and click Next.

If you are unsuccessful in setting up a server it is still possible to save the exam or pool as a "zip" file and upload it manually.

Additional steps for uploading this zipped file into Blackboard can be found here: http://blackboardhelp.wordpress.com/2011/01/28/import-a-test/

Setting up UAS Blackboard on the Campus Wide licenses Respondus

media_1344291276327.png

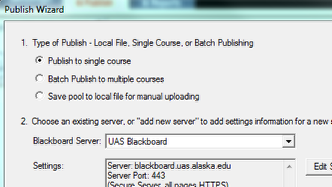
Give the server a name (such as UAS Blackboard) and enter your UA username and password (the same as you use to login to UAS Online). Check the box to save if you wish. Click Next to continue. The server will attempt to connect. If it reports success then you are all set up! Click Next and Finish.

If there are problems it may be that

  • Your username and password are incorrect (or you have not yet visited a UAS Blackboard course and are not in the Blackboard database).
  • The settings have changed and the set-up file is out of date

Uploading a Test using Respondus

media_1344292116156.png

Once the Blackboard server is set up, choose that server and click Next

Uploading a test or pool but not deploying it

media_1344292472692.png

To upload the test to Blackboard but not deploy it
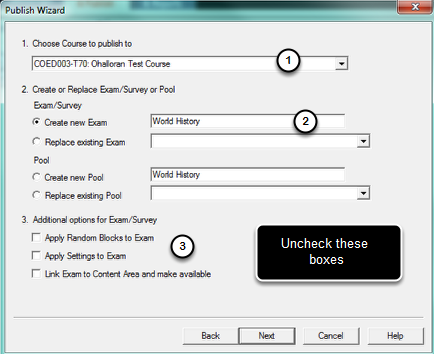
(1) Choose the course
(2) Give the test (exam) or pool a new name
(3) Uncheck all the boxes for deploying the test
Click Next and when success is reported click Finish. The test or pool will be uploaded to the Test Manager – you will still need to deploy it.

To upload and deploy a Test at the same time, you’ll first need to go the Settings tab in Respondus and choose the Test Options. Then you can publish. You’ll be given a chance to browse and select the Content Area into which you want to deploy the test.

More about Respondus: When you create a test or pool in Respondus it creates and saves a "Respondus File" – usually in a folder called Respondus Projects in My Documents. You can re-open this file to edit or re-upload your test rather than starting from the Word file. There are many more options in Respondus (such as printing tests, retrieving tests and so forth). Use the Help documentation within Respondus to learn more.