Creating Weighted Totals

This lesson explains how to construct a weighted average to correspond to the percentages given in your syllabus

Show/Hide/Delete the Weighted Average

media_1321646734005.png

With each new course a weighted average column is automatically created in Blackboard. Until you have it set up correctly it is a good idea to hide it from the students.

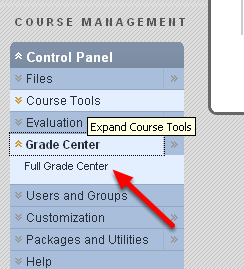
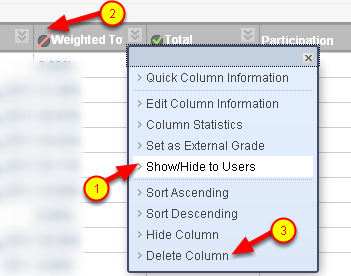
To show/hide or delete, go to the Full Grade Center in the Control Panel. Using the dropdown list next to the Weighted Column, you can toggle Show/Hide to Users (1 above). When the column is hidden from students you will see a circle with red line at the top of the row (2 above).

If you import content and the gradebook from an old course into a new course, you may have two weighted average columns in the gradebook – one empty one that was created with the new course and an existing one that was imported. Usually you want to delete the new column and keep the old column which is already set up according to your grading scheme. Delete the column using the Delete Column command (3 above). You can always add it back by creating a Calculated Column.

Create Categories

media_1321646983283.png

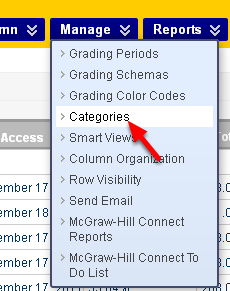
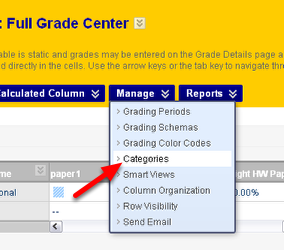
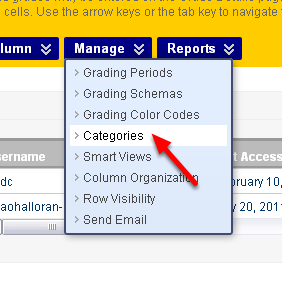
The first step to creating a Weighted Total that reflects percentages given in your syllabus is to create Categories. From the Manage menu choose Categories.

Create Categories that correspond to your syllabus

media_1321903724392.png

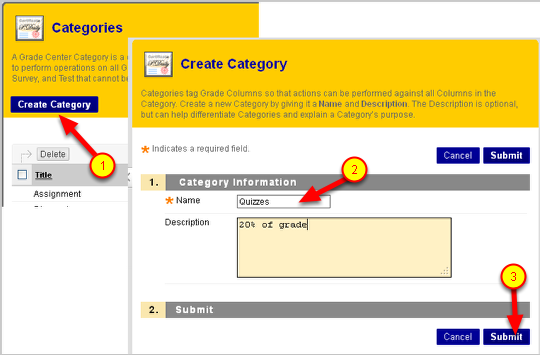
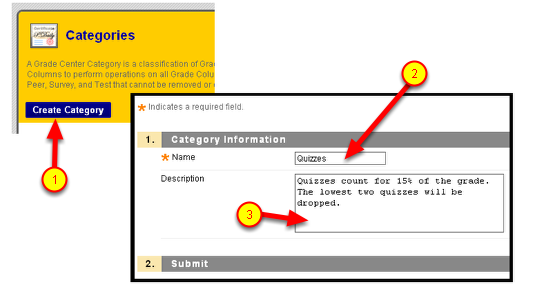
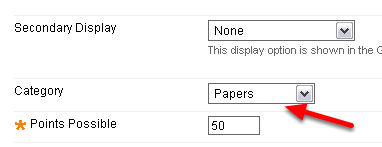
Click on the Create Category button and then set up your categories to correspond to your syllabus.

For example, if your syllabus has these items set at these percentages:
Quizzes: 20%
Homework: 25%
Discussion Board: 15%
Midterm and Final: 40%

Then you might define these categories:
Quizzes
Homework
Discussion
Exams

For each Category, click the Create Category button (1) and enter a name and description (2), then click Submit (3).

The Category List

media_1321903796492.png

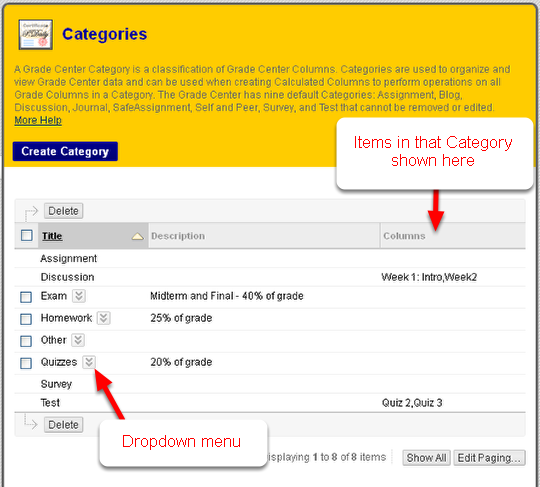
Once you’ve created Categories, the listing will show the Categories you have made plus the Categories automatically created by Blackboard. It will also show the items which are currently in each Category (under the heading "Columns". Here the Discussion Forums "Week 1: Intro" and "Week 2" are already in the Discussion Category – when you choose to make Discussion Forums gradeable they are automatically put in that Category. The Quizzes "Quiz 2" and "Quiz 3" are in the Test Category – we will need to move them to the Quiz Category.

You can use the drop-down menu next to each Category to Edit or Delete it. You may remove any categories you don’t need except for the ones that are used automatically by Blackboard (e.g., Test, Discussion, Survey, Assignment). For those Categories you will not see a drop-down menu.

Creating the Weighted Total – Weighting by Category

media_1321913177402.png

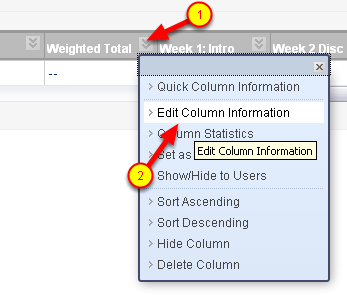
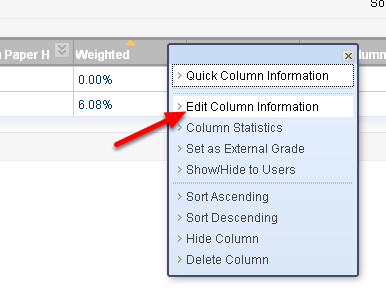
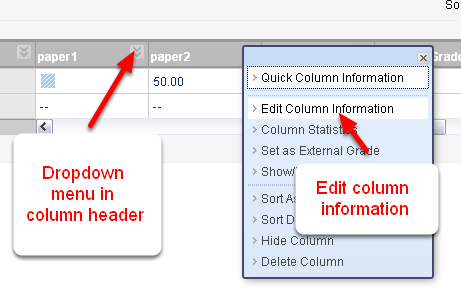
Now go back to the Full Grade Center and edit your Weighted Total.
To do that, click on the dropdown menu next to the Weighted Total Column (1) and choose Edit Column Information (2).

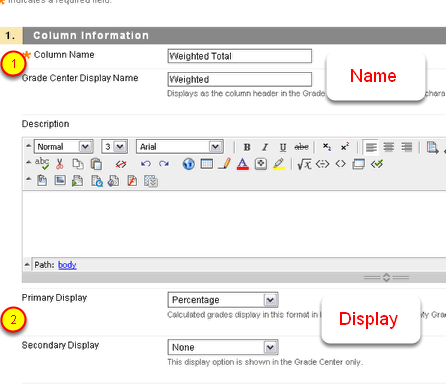
Setting up Weights by Category

media_1321913342185.png

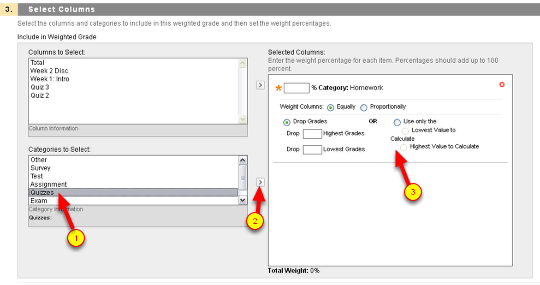
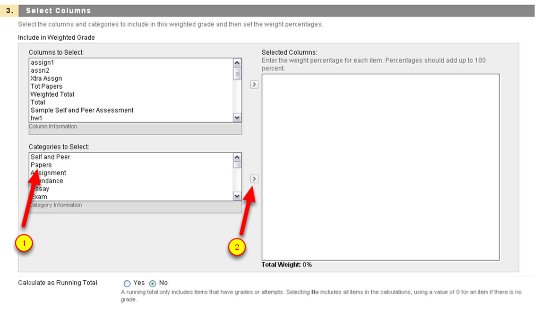
Scroll Down to 3. Select Columns

You will see Columns to Select and Categories to Select. From within Categories to Select choose the Categories that Correspond to your syllabus weighting (1), then click the right-facting arrow (2) and that Category will be added to the list on the right (3).

Give each Category a Weight

media_1321913584831.png

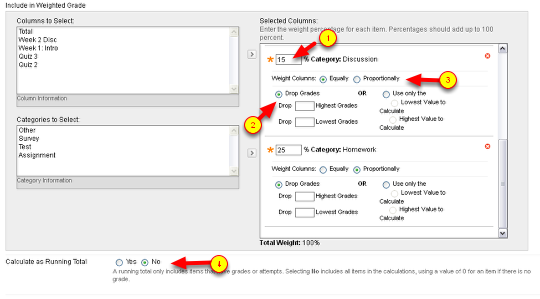
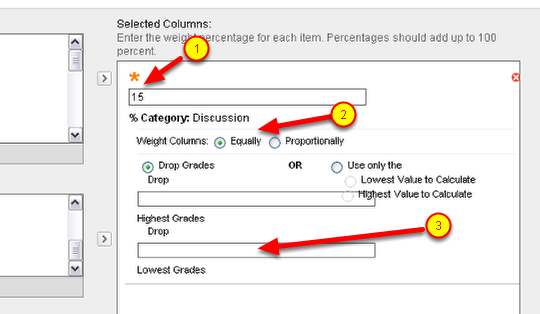
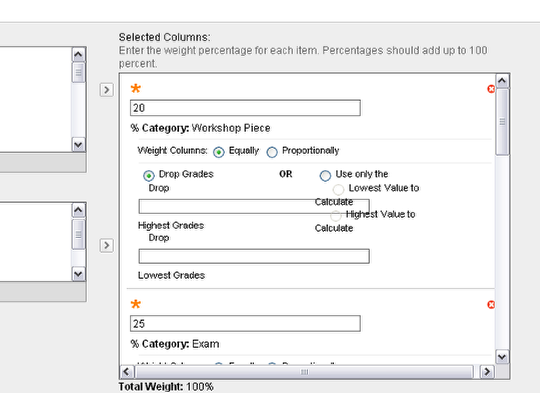
(1) Type in the percentage weight for each Category
(2) Choose whether the items in that Category will count Equally (meaning they all count the same regardless of how many points they are given: a 20 point item will count the same as a 10 point item) or Proportionally (meaning if an item has more points it will count more: a 20 point item will count twice as much as a 10 point item).
(3) Choose to drop the lowest scores if you wish

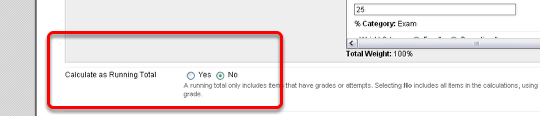
(4) Finally – choose whether the weighted total should be counted as a Running Total. Yes means that items which are not graded yet do not count – you will have to go and enter zeroes for any ungraded items before they count as not completed. No means that any ungraded items count as zero. A Running Total can be useful to let students know their progress, but can also be deceptive because a heavily weighted item (such as a midterm, final exam or heavily weighted project) will can cause a big change in the percentage recorded once it has been graded. Choosing "No" means the Weighted Total will start at zero and gradually build up over the semester.

Scroll down and click Submit

Putting Items into Categories

media_1321913996344.png

When computer graded items are created, columns are automatically added to the gradebook and these items are placed in Categories according to what type of item they are (Tests, Assignments, Discussion, etc). You will need to move items into the correct Category for them to be counted correctly

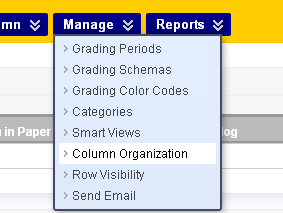
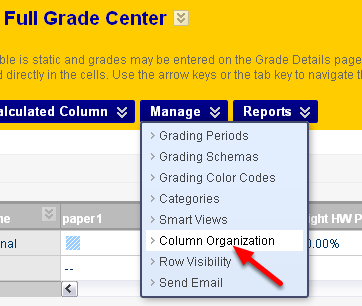
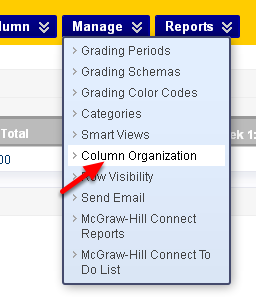
Go back to the Full Grade Center and from the Manage menu choose Column Organization

Change the Categories to Match the Syllabus

media_1321914056012.png

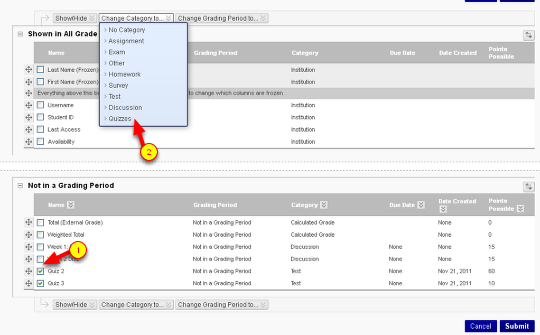
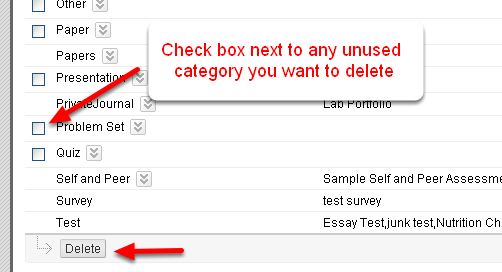
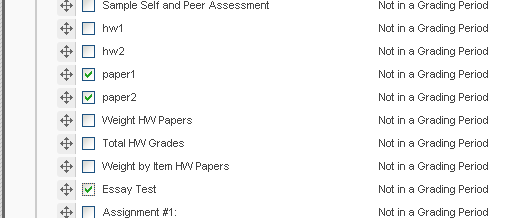
Here we will move the two quizzes from the Test category (in which they were automatically placed) into the Quizzes category.
(1) Check the boxes next to the items (Quizzes in this case)
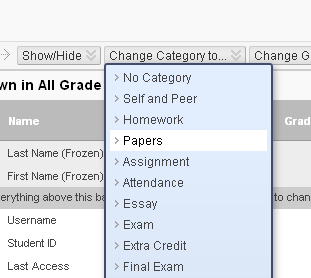
(2) Scroll up to the top and from the "Change Category to" list, choose the Quizzes category.

The two Discussion forum items are already in the automatically created Discussion category so they do not need to be changed.

As more items are posted into the gradebook they must be moved to the correct Category. Homework, for example, may be created as a Blackboard Assignment – it will be necessary to move them into them to the "Homework" Category which was used in the Weighted Total.

You can look at the Column Organization list any time you want to check whether things are in the correct Categories.

Handling Makeup Assignments

You may have occasion to give a makeup exam or text. If this makeup is optional, do not want to include this in the Weighted Average since it will penalize those who did not take the makeup exam. This means you should NOT put makeup exams in the Category used in the Weighted Total. The easiest way to handle this include the column for the original test in the correct Category and then manually change the students grade for the original test to reflect their score on the makeup.

If you have a large number of students who do a makeup test, then you can create a new Calculated Column that includes only the two tests (original and makeup) and drop the lowest score in that new Calculated Column. Put the Calculated Column (rather than either of the two tests) in the category used in the Weighted Total.

Weighted Totals

Many instructors use a weighted total to calculate their grades. This lesson explains how to set up a weighted total using categories.

Set up your grading scheme in your syllabus

Your syllabus should let your students know your grading scheme. For example:

  • Discussion Participation = 15%
  • Quizzes = 20%
  • Workshop Piece = 20%
  • Essay (including rough draft) = 20%
  • Midterm, Final Exam = 25%

The totals should add up to 100%. The actual weighting will of course reflect the goals and objectives of your own course.

Set up categories to match the categories in your syllabus

media_1306178762483.png

Define categories in Blackboard to match the categories in your syllabus. In the Full Grade Center you will go to "Manage" and then choose "Categories".
For more details go to
http://blackboardhelp.wordpress.com/2011/05/23/creating-and-managing-categories/

You should have categories corresponding to everything in your syllabus. In this case:

  • Discussion
  • Quiz
  • Workshop Piece
  • Essay
  • Exam

Create or Edit a Weighted Total

media_1306178947721.png

The "Weighted" Column is created automatically when a new blackboard shell is created. Look for this column, click on the two downward facing arrows to the right of the column header and from the menu choose "Edit Column Information"

You can also add a new column by moving your mouse over the "Create Calculated Column" button and choosing "Weighted Column". if you do so, then delete the Weighted Column that came with your course. The Delete Column choice is visible in the menu above. When you copy a course which has a weighted column into a blank shell you also end up with two weighted columns – delete the one you are not using.

Notice also that you have a choice to "Show/Hide" the column to Users. If you hide the column it will appear in your grade center with a circle with a red slash next to it – indicating it is hidden from students but not from you. This is a good way to display information that might be useful to you (such as unweighted total points) but is confusing to students.

Enter Column Information

media_1306180074422.png

Whether you start a new column or edit column information –

  1. Your column needs a column name. The grade center display name may be a shorter version of this.
  2. Primary Display is generally set to Percentage. It is not recommended that you set it to "Letter" because the exact letter grade is not meaningful until the end of the semester when all the grades are entered.

Scroll Down to Select Columns

media_1306180178793.png

You can weight by item (grade column) or by category
In this example we will weight by category

  1. Click on a Category Name on the left (one that matches you syllabus
  2. Click on the right facing arrow to move it into the box on the right.

Set the weight and other options

media_1306180840199.png

Once you’ve chosen a category and clicked the right-arrow, it will be on the list to the right. Set the percentage and options.

  1. Enter the percentage mentioned in your syllabus.
  2. Decide if you want the items to be weighted equally of proportionally. If equally, all that matters is what percent of the total score the student got on each item (such as 17 of 20 points). An item that is 20 points will "count" the same as an item that is 10 points. If you check "proportionally" a 20 point item will count twice as much as a 10 point item.
  3. If you choose to drop some of the scores (the two lowest quizzes for example) then enter a number (the number 2 in the lower box)

Enter all categories

media_1306182024211.png

Enter all the categories from your syllabus and give them the appropriate weights.

Calculate as Running Total? Yes or no?

media_1306182111059.png

Under the category list you will find the choice of whether or not to Calculate as Running Total.

  • If YES then blanks in the gradebook will not count – only the items that have grades or for which zero has been entered will count.
  • If NO then blanks will count as zero

Running total YES may give a better number as the semester goes by, but can still be misleading (e.g., if a student has done well on a number of quizzes that are not weighted highly but then take an exam with a much greater weight and don’t do so well – their percentage can change drastically. Students should always be made aware that grades are not complete until everything it graded.

Running total NO may also be misleading if all or your items are not yet in your gradebook or are not yet in the right category.

Other Options

media_1306182845156.png

Set other options. Usually you will NOT want to include this column in Grade Center Calculations (i.e., it is not part of the Total). You can choose to show/hide this column from students and change this option later.

When you are done click Submit

Make sure all your items are in the correct categories

media_1306183016464.png

Throughout the rest of the semester you will need to make sure all your items are in the correct categories. Go to Manage then Column Organization to view and change categories in bulk
.
For more details go to
http://blackboardhelp.wordpress.com/2011/05/23/creating-and-managing-categories/

Many items automatically go into categories

  • Graded Discussion Forums go into "Discussion"
  • All online quizzes, tests, etc go into "Test"
  • All assignments (tool for accepting and returning papers) go into "Assignments"

This means you will have to move things to correct categories. For example – if your online tests include both "Quizzes" and the midterm and final exams, you’ll need to move the quizzes into the category "Quiz" and the midterm and final into a category "Exam" (or leave them in "Tests" and use that only for these items). Similarly if the Assignment feature is used for turning in assignments that fit into different categories, you’ll need to manually move each into its correct category. This can be done either by editing Column Information individually (using the dropdown menu next to the column header in the main Grade Center) or by going to Manage and Column Organization as shown above.

Creating and managing categories

Categories are used to organize your grade center and calculate weighted grades. Some items go automatically into categories:

  • Online tests, quizzes, etc. go into the category “tests”
  • Graded discussion forums go into “discussion”
  • “Assignments” (the tool for turning in an returning papers) go into the category “Assignments”

These may or may not match your grading scheme. For example – some of your online tests may be “quizzes” while others are midterm exams, unit exams, etc. Some of your discussion may count as “Participation” while others count in other categories. You can create as many categories as you need and place grade columns in the appropriate category.

Go to the grade center

media_1306171748442.png

In the Control Panel, expand “Grade Center” then click on “Full Grade Center”.

Under “Manage” go to “Categories”

media_1306171837834.png

In the Grade Center, move your mouse over the Manage button and then click on “Categories”.

Create the category you want

media_1306173725617.png
  1. Click on the “Create Category” button
  2. Give your category a name
  3. Add a description if desired.
  4. Click Submit

Delete unwanted categories

media_1306174113106.png

In the Grade Center, after you click on “Manage” and then “Categories, you may have noticed that you have all your categories listed. This includes pre-made categories as well as any you have created. You can simplify things by deleting unwanted Categories. (You cannot delete categories that are in use or those which are the automatic categories such as “test”, “discussion”, “assignment”)

Simply check the box next to any unused category you want to delete, then click the delete button.

This screen is also a good place to quickly see which categories your items are already in.

Placing items in categories

media_1306174292434.png

To place an individual item in a category, click on the drop-down menu in the column header (the downfacing arrows) then click Edit Column Information

Assign a Category

media_1306174796960.png

Within area 1. Column Information, choose a category for that grade column.

Change category for multiple items

media_1306174972066.png

You can change the category for multiple items at the same time.

  • In the Full Grade Center, Go to Manage and Column Organization

Check off the items you want to place in the same category

media_1306175069243.png

Check the box next to all the items you want to place in the same category

Scroll to the top or bottom and look for the button “Change Category to …”

media_1306175291176.png
  1. Scroll to the top or bottom and find the button “Change Category to … “
  2. When you move your mouse over this button – you’ll get a list of all the categories.
  3. Click on the Category you wish to move your items into.

Next step: Weighted grades by category

One to the most useful features of categories is that you can make a column to calculate a Weighted Total using categories. This will be described separately.