Static and dated Announcements and Assignments that are exported from UAS Online will be imported into Blackboard as HTML (web) pages. That is, each separate Announcement or Assignment will be an individual HTML page, including any formatting, images, links etc. Webliography and Bibliography are treated in the same way.
These will be located in the Course Content area inside separate folders.
Imported Announcements and Assignments
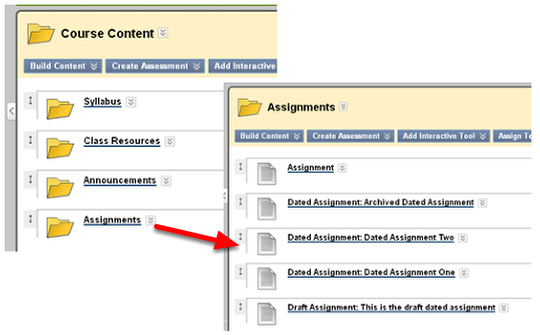
All static and dated Announcements or Assignments will be imported, including with drafts and archives. They will all be visible to students. Clicking on one of these links will open that Assignment or Announcement.
Suggestion
One way to manage the imported Announcements and Assignments is to make the folders that contain them invisible to students then moving the items you wish to re-use into a new Content Area or Folder. The invisible folders will serve as containers for "draft" version of Announcements or Assignments.
Lets look at how you would make a Folder invisible to students and then move a particular item in it to a new Content Area or folder.
Making a Folder Inaccessible to Students
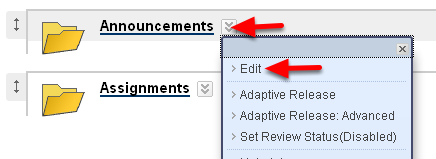
Click on the drop-down menu next to the folder name, then choose "Edit"
Rename the folder and make it invisible
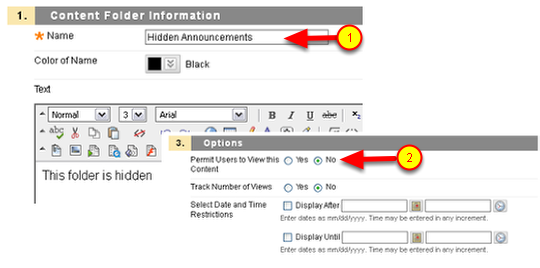
(1) Rename the folder if you wish. You can also add a description.
(2) Scroll down and in step 3 change "Permit Users to View this Content" select "No".
Click Submit
Imported Announcements and Assignments are now invisible to students
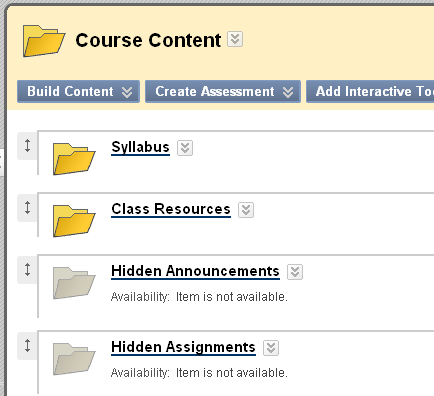
The imported Announcements and Assignments are now invisible to students.
Suppose that you want to re-use one of these Announcements or Assignments. You can do this by moving or copying it to the appropriate Content Area or Folder. As an example, let’s move an Announcement to the "Getting Started" section.
Click on the name of the "Hidden Announcement" folder to go inside it.
Moving or Copying
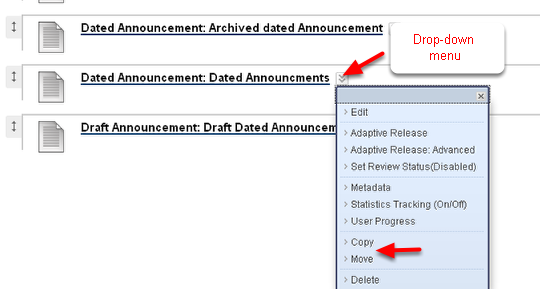
Click on the drop-down menu next to the name of the Announcement or Assignment you wish to copy or move and choose Copy or Move.
Browse and select Content Area or Folder
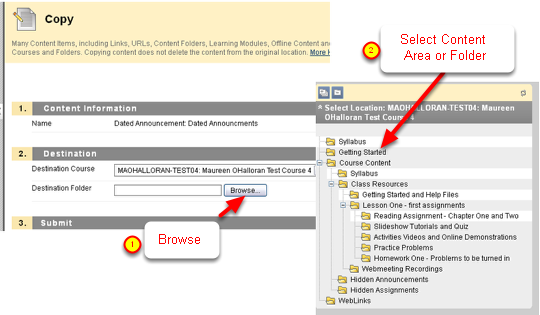
After you choose Copy or Edit, you will get a dialog box which lets you choose any course in which you have instructor access.
(1) Click on the Browse button
(2) A window pops up which shows every Content Area on the Course Menu and every folder in your course.
Click on the name of the Content Area or Folder to which you want to copy or move.
Click Submit.
The Announcement or Assignment can now be found in the new location.
Re-creating Announcements or Assignments as Items
The HTML files which are created from your old Announcements and Assignments cannot be edited online and are difficult to edit even if you download them to your computer. If you plane to re-use Announcements or Assignments, you will need to recreate them as Blackboard Announcements or as Blackboard Items. To do this you will:
- Copy the material from your imported Announcement or Assignment
and then either
- Create a Blackboard Announcement by clicking on Announcements in the Course Menu and then "Create Announcement"
or
- Create a Blackboard "Item" in the Content Area or Folder of your choice.
Create a Blackboard Item
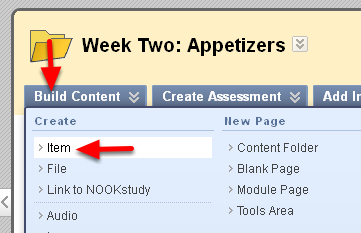
To create a Blackboard Item, go to the appropriate Content Area and Folder. At the top of every Content Area and Folder you’ll see the buttons "Build Content", "Create Assessment", "Add Interactive Tool", etc,
- Move your mouse cursor over "Bulld Content" and select "Item"
Name the Item and paste the content from the UAS Online Assignment into the textbox.
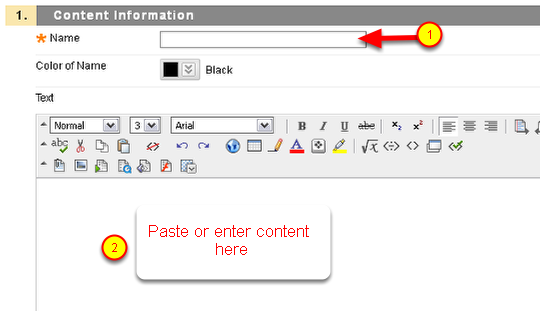
(1) Name the Item
(2) Paste your content in the textbox
Scroll down and click Submit. (You also have options to attach files and limit availability.)
You will now easily be able to edit the Item.
Re-ordering and editing Items.

Newly created Items will be at the bottom of the Content Area or Folder. Use the double-headed arrows on the left (1) to drag them up or down and re-order them.
Use the drop-down menu to the right of the Item name (2) to get a menu and choose "Edit" to get back to the textbox that lets you edit or format the content of the Item. You will also be able to change its availability.