Importing Static and Dated Announcements and Assignments

Static and dated Announcements and Assignments that are exported from UAS Online will be imported into Blackboard as HTML (web) pages. That is, each separate Announcement or Assignment will be an individual HTML page, including any formatting, images, links etc. Webliography and Bibliography are treated in the same way.

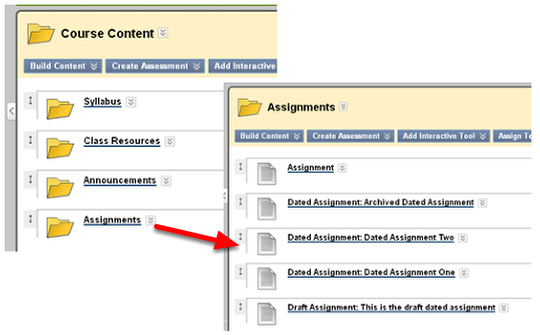
These will be located in the Course Content area inside separate folders.

Imported Announcements and Assignments
media_1334005865801.png

All static and dated Announcements or Assignments will be imported, including with drafts and archives. They will all be visible to students. Clicking on one of these links will open that Assignment or Announcement.

Suggestion

One way to manage the imported Announcements and Assignments is to make the folders that contain them invisible to students then moving the items you wish to re-use into a new Content Area or Folder. The invisible folders will serve as containers for "draft" version of Announcements or Assignments.

Lets look at how you would make a Folder invisible to students and then move a particular item in it to a new Content Area or folder.

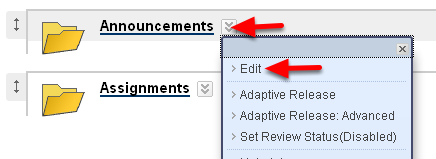
Making a Folder Inaccessible to Students
media_1334006013876.png

Click on the drop-down menu next to the folder name, then choose "Edit"

Rename the folder and make it invisible
media_1334006352637.png

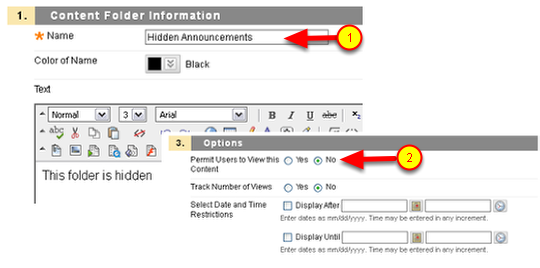
(1) Rename the folder if you wish. You can also add a description.
(2) Scroll down and in step 3 change "Permit Users to View this Content" select "No".
Click Submit

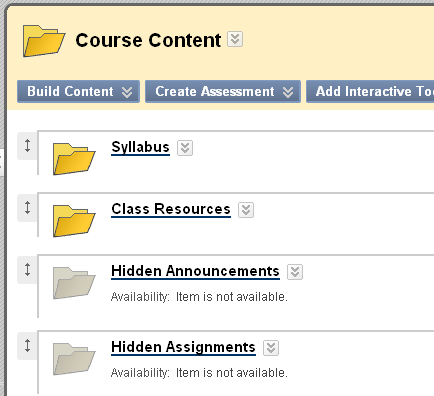
Imported Announcements and Assignments are now invisible to students
media_1334006599935.png

The imported Announcements and Assignments are now invisible to students.

Suppose that you want to re-use one of these Announcements or Assignments. You can do this by moving or copying it to the appropriate Content Area or Folder. As an example, let’s move an Announcement to the "Getting Started" section.

Click on the name of the "Hidden Announcement" folder to go inside it.

Moving or Copying
media_1334006877639.png

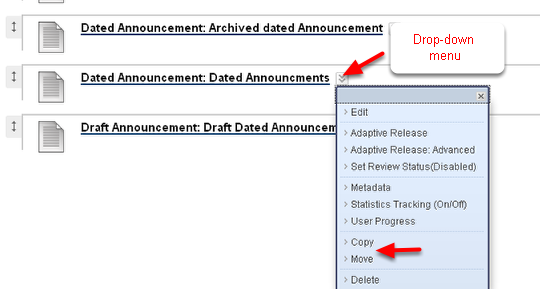
Click on the drop-down menu next to the name of the Announcement or Assignment you wish to copy or move and choose Copy or Move.

Browse and select Content Area or Folder
media_1334007288988.png

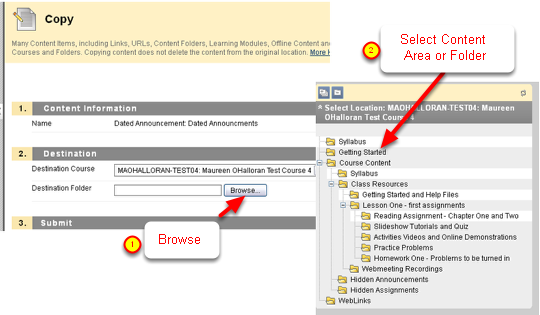
After you choose Copy or Edit, you will get a dialog box which lets you choose any course in which you have instructor access.
(1) Click on the Browse button
(2) A window pops up which shows every Content Area on the Course Menu and every folder in your course.
Click on the name of the Content Area or Folder to which you want to copy or move.
Click Submit.

The Announcement or Assignment can now be found in the new location.

Re-creating Announcements or Assignments as Items

The HTML files which are created from your old Announcements and Assignments cannot be edited online and are difficult to edit even if you download them to your computer. If you plane to re-use Announcements or Assignments, you will need to recreate them as Blackboard Announcements or as Blackboard Items. To do this you will:

  • Copy the material from your imported Announcement or Assignment

and then either

  • Create a Blackboard Announcement by clicking on Announcements in the Course Menu and then "Create Announcement"

or

  • Create a Blackboard "Item" in the Content Area or Folder of your choice.

Create a Blackboard Item
media_1334008295074.png

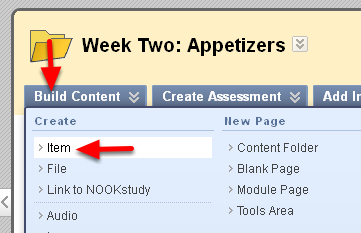
To create a Blackboard Item, go to the appropriate Content Area and Folder. At the top of every Content Area and Folder you’ll see the buttons "Build Content", "Create Assessment", "Add Interactive Tool", etc,

  • Move your mouse cursor over "Bulld Content" and select "Item"

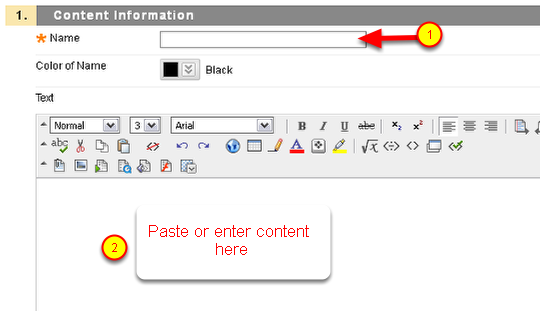
Name the Item and paste the content from the UAS Online Assignment into the textbox.
media_1334008379880.png

(1) Name the Item
(2) Paste your content in the textbox
Scroll down and click Submit. (You also have options to attach files and limit availability.)

You will now easily be able to edit the Item.

Re-ordering and editing Items.

media_1334008699310.png

Newly created Items will be at the bottom of the Content Area or Folder. Use the double-headed arrows on the left (1) to drag them up or down and re-order them.
Use the drop-down menu to the right of the Item name (2) to get a menu and choose "Edit" to get back to the textbox that lets you edit or format the content of the Item. You will also be able to change its availability.
Using the Export Tool from UAS Online and Importing into Blackboard

To move content, tests, and resources from UAS Online to Blackboard you will:

  1. First go to your UAS Online Course
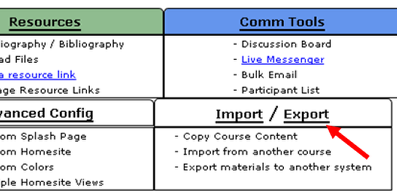
  2. Use the Export tool found in Instructor Tools
  3. Save a "package" file to your computer
  4. Next go to your new Blackboard Course
  5. Use an Import tool there to upload the package file

The UAS Online Export tool is described below.

Go to your old course in UAS Online

media_1333735667892.png
  • Login to UAS Online and go to your old course. You should have Instructor Tools on your menu.
  • Within Instructor Tools: Click on Export

Select the items you wish to export

media_1333735926767.png
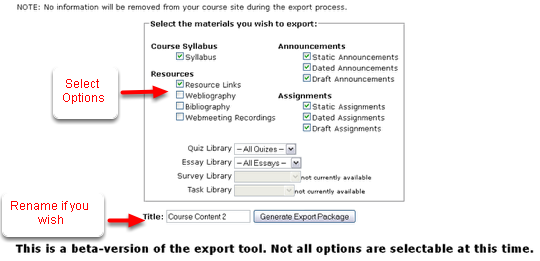
  • Select the Items you wish to Export.
  • In the box labeled "Title" you will see the default name of the Content Area into which Blackboard will import your resources, links etc. The default is to import into the existing Content Area labeled "Course Content". If you change this name, Blackboard will create a new Content Area (new area on the Blackboard Course Menu).

Click the button labeled Generate Export Package

The package file is created

media_1333736101958.png

After a while (the time will depend on how much content you have to export) a package file will be created – you’ll see a link to the file near the top of the page.
Click on the link and save the package file to your computer. You can rename it but be sure and keep the extension .smscc
NOTE – if you rename the file do not include spaces or unusual characters in the file name (you can include dash or underscore, but not characters such as &, # etc.)

After you save this file to your computer, the next step will be to import it to your Blackboard course site.

Go to your new Blackboard course site

media_1333736560922.png

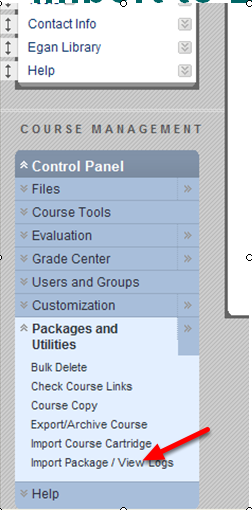
Login to your new Blackboard course site. You should see the Control Panel in the lower left below the Course Menu.

  • Click on Packages and Utilities to expand it
  • click on Import Package/View Logs

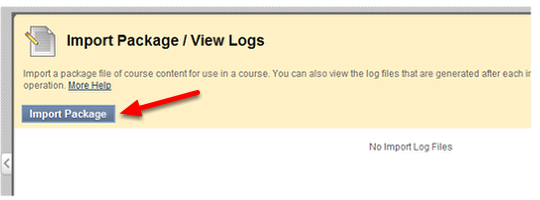
Click on the Import Package button on the left

media_1333736644501.png

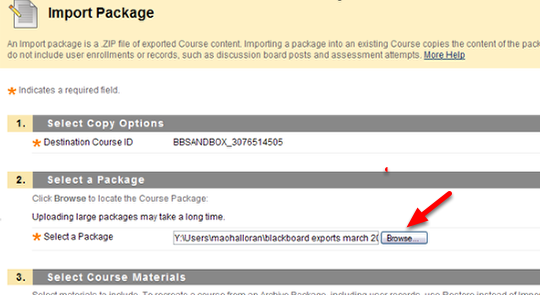
Browse and select your package file

media_1333736807673.png

Click the Browse button and select the package file that you previously saved to your computer.

Select the types of items you wish to import

media_1333737009591.png

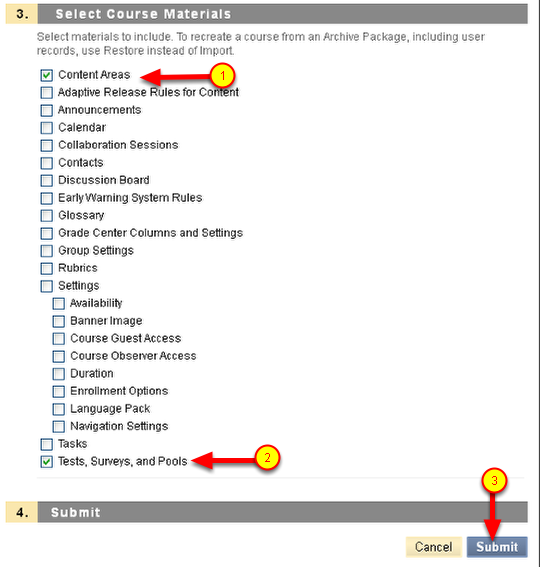
Select the types of items you wish to import.

  • "Content Areas" (1) will need to be checked to import resources (files and links) or Announcements/Assignments/Webliography/Bibliography(as static html pages).
  • "Tests, Surveys and Pools" (2) will need to checked to import Quizzes and Essays

Completing the Import Process

media_1333737299203.png
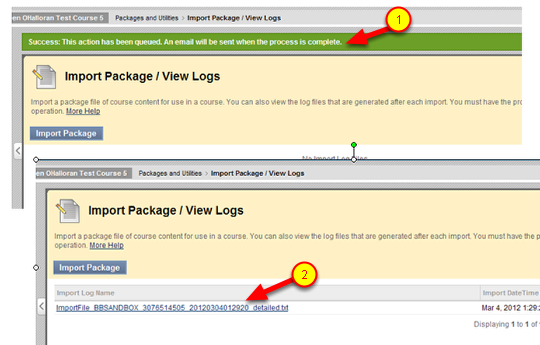
  • A "Success" message (1) should appear near the top of the page – you will get an email when the import process is complete.
  • Do not edit your course until the process is complete!
  • A log file (2) will appear when the import process is complete (you will need to reload the page to see it).

The log file frequently may contain warnings and non-fatal errors. If the import process appears to have worked satisfactorily you can ignore them. If it doesn’t work, the log file can be forwarded to the helpdesk along with information about what UAS Online course/semester you exported from and which Blackboard course/semester you are importing to.

Where to find your imported content

media_1333738408402.png
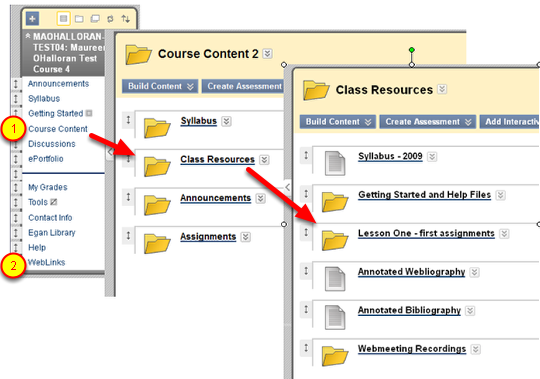
  • Your Resources (files and links) and html pages created from Announcements, Assignments, Webliography and Bibliography will be imported into the Course Content area (1) on your Blackboard Course menu (unless you decided to create a new Content Area by renaming it).
  • A new Content Area called Weblinks (2) will also be created and contain any links that were exported. These are duplicates – they will also be imported into Course Content in the appropriate locations.
  • Clicking on Course Content, you’ll see folders corresponding to the different types of items.
  • Clicking on Class Resources, you’ll see your imported Resources (sorted into folders if you used Categories) as well as Webliography, Bibliography, and links to Web Recordings.

Where to find your imported tests

media_1333738844919.png
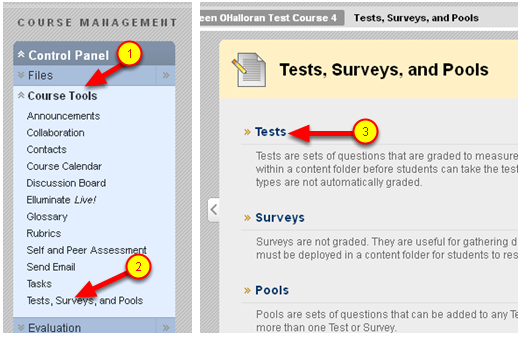
  • Go to the Control Panel located below the Blackboard Course Menu and click on Course Tools (1) to expand it.
  • Click on Tests, Surveys and Pools (2)
  • When that page loads, click on Tests (3)

Quizzes and Essays are both imported as Tests

media_1333741397225.png

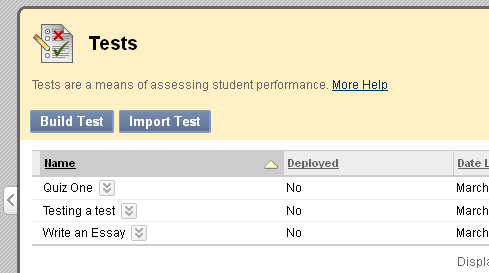
All of the Quizzes and Essay tests you exported will be listed. They are not deployed (posted) to any Content Area yet. In Blackboard, both Quizzes (containing multiple choice and other types of computer graded questions) and Essay Tests (containing questions to be answered in written form) are considered "Tests" – they just contain different question types.

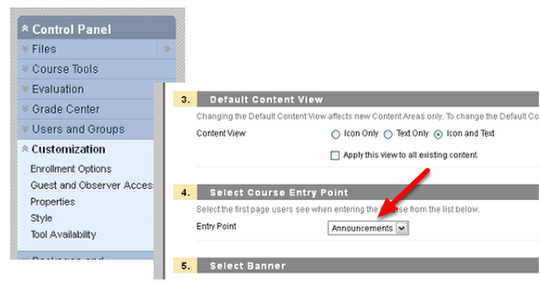
WARNING! – The imported content area becomes the Entry Point for your course.

media_1333746796504.png

When using the UAS Online to Blackboard export/import tool. The Content Area becomes the Entry Point for the course (rather than the default Annoucements).

You usually want announcements to be the entry point – so anyone entering the course won’t miss Announcements. Reset the Entry Point by doing the following:

  • In the Control Panel click on Customization
  • Click on Style
  • Scroll down to item number 4 and where it says "Entry Point" – change the selection to Announcements.

Recreating UAS Online Tasks as Assignments

UAS Online Tasks cannot be imported into Blackboard but can be recreated as Blackboard Assignments. To do this you will need to cut and paste between your old UAS Online class and your new Blackboard class. The easiest way to do this is to have the two classes open in different browser windows or tabs and switch between them.

Read more about Blackboard Assignments here: Getting Started with Assignments (pdf)

Open both your UAS Online class and your Blackboard Class

  • Go to UAS Online and login
  • Browse to find your old UAS Online class – right click on the name (cntrl-Click on a Mac) and open in a new window or tab
  • Brose to find your new Blackboard class – open this in a sepate window or tab as well

In your UAS Online class – go to Instructor Tools and then Assignments

media_1333925328670.png

In your old UAS Online class – go to Instructor Tools and then Assignments and open the Task Library
Your task may have:

  • A Name
  • Instructions
  • One or more attachments.

A Blackboard Assignment has these same features. It allows students to submit one or more attached files or to use a textbox in response to your instructions and provides a mechanism for you to submit grades, comments and returned files or papers.

Click on the Test Link to view this task.

View the task and save any attachments to your computer

media_1333925424603.png

Save any attachments that are including in the instructions to your computer. If necessary, choose right-click (cntrl-click on a Mac) and "Save Link As …" or "Save Target As …"

Copy the Instructions to your computer

media_1333925828204.png

Select the text of the instructions and copy. You can type Cntrl-C to copy or right-click and choose Copy.

Switch to your Blackboard course.

media_1333926274523.png

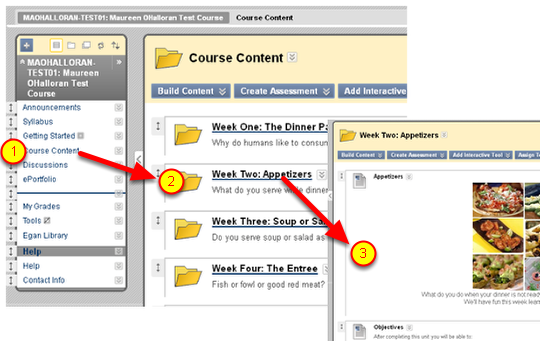
Browse to the content area or folder in which you wish to post your Blackboard Assignment (formerly a UAS Online Task)
In this example, the Assignment will be posted in the Week Two folder which is in the Course Content area.
Click on Course Content and then the Week Two folder

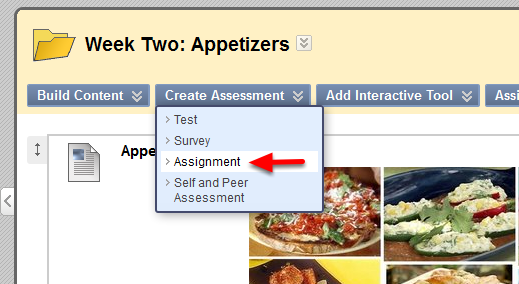
Select Create Assessment > Assignment

media_1333926435921.png

At the top of any Content Area or Folder you’ll see the buttons Build Content, Create Assessment, Add Interactive Tool, etc.
Move your mouse cursor over Create Assessment and choose Assignment.

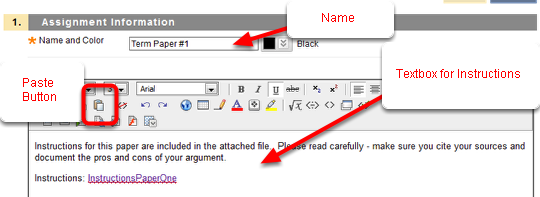
Give the Assignment a Name and paste the instructions into the textbox

media_1333926618297.png

Step 1: Give the Assignment a Name and then paste the Instructions in the textbox indicated.
Click inside the textbox and type Cntrl-V for Paste. You may also use the Paste button which looks like a clipboard.

Adding back the attachments

media_1333927111225.png

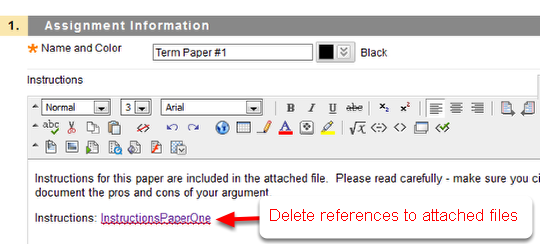
If the text you copied from your UAS Online course included links to attachments, these will still refer to documents in your UAS Online course. To make it easier to edit and update these in the future, it is safer to remove these links and re-attach the files. This will add these files to your Blackboard course.

Delete the references to attached files.

Adding back the attachments inside the Instructions

media_1333927240274.png

There are two ways to add attachments to an assignment.
One way is to scroll down to Step 2 and use the "Browse My Computer" button to add one or more attachments. This is the simplest way. After you add attachments they will appear as links below the Name of the Blackboard Assigment and above the Instructions.

Adding attachments

media_1333927361587.png

After you click the Browse My Computer button (1) and find and select the file you want to attach, you’ll see the name of the file below the Browse button. If you want the link to the file to have a different name – fill that in under "Link Title". The "Do not attach" link allows you to remove any linked files if you made a mistake. You can attach multiple files by clicking the Browse My Computer button repeatedly.

Adding attachments, images, etc within the instructions.

media_1333927569487.png

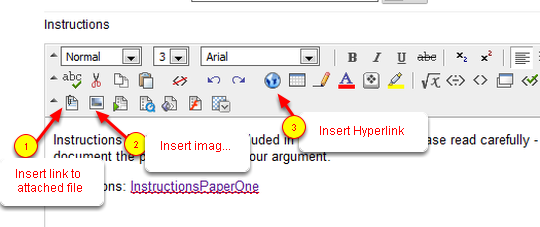
It is also possible to add attached files, images etc. within the instructions. Place your cursor where you want the file or image to appear and then:
(1) Use the button that looks like a paper with paperclip to attach files.
(2) Use the button that looks a picture to insert an image.

You will get a dialog box which will allow you to Browse and select the file or image file from your computer and set options.

You can learn more about the tools in the Rich Text Editor by hovering over the buttons.

Give your Assignment points

media_1333928164056.png

Step 3: The act of creating a Blackboard Assignment will automatically put it in the gradebook. You’ll need to give your Assignment points.

Set Availability

media_1333928308421.png

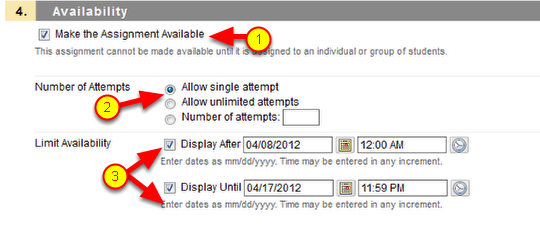
In step 4 you set the availability. You can make the Assignment available and then over-ride that with a a time window to limit availability. (That is you must leave the Assignment available AND check the boxes and select a date range.)
(1) Leave the box "Make the Assignment Available" checked (unless you want it to NEVER be available).
(2) Set the number of allowed attempts
(3) Check the boxes if you wish to set a time window and then choose dates and times.

Set optional due date

media_1333928535127.png

The due date in step 5 is optional. It will provide the students with information about the due date but will not enforce that deadline in any way (you must set a time window to do that). Some instructors prefer to inform students about due dates in other ways and so leave this box blank.

Click Submit to finish.

Back in the Content Area or Folder

media_1333928688453.png

Back in the Content Area or Folder you’ll see the Assignment. It will be grayed out for you (and invisible to students) if it is unavailable or not within the time window you have set. If you only see "Item not available" that means it will NEVER be available to students. If there is a time window, then the information about when it will be (or has been) available will be given.

You can click on the link to the Assigment to see how it looks to students. Once student files are submitted, you will collect them from the gradecenter and submit grades, comments and returned papers there. Students will go to their own gradebooks (My Grades) to see their own grades, and your comments and returned files.

Editing the Assignment

media_1333928874548.png

To Edit or Delete the Assignment – use the drop-down menu next to the Assignment name.